Introduction
As an ‘internal’ Martial Art, Wing Chun involves reprogramming the mind and body to maximise the speed and power the body can generate. In past times this internal understanding was a ‘feeling’ that was passed from Master to Student. With a modern understanding of anatomy and physiology it is possible to describe and visualise these ‘feelings’ of inner bodily workings. This article continues a series of articles that seek to explain in a tangible way what muscles are being, and which muscles need not be used to help the the developing Wing Chun student seeking to master the necessary relaxed structure to create a whole-body unity which maximises their speed and power. Ultimately, however, each student will need to still ‘feel’ relaxed structure for themselves, which takes time and effort – there are no short-cuts in Wing Chun.
This article is the first in a series of articles that form section 5: Guide to relaxing and the use of gravity. This provides some exercises and insights into how to achieve correct, relaxed, structure posture using gravity to minimise muscle effort.
In previous articles I have explained that the developing student must strip out the muscular tension that starts in the beginner, from a top-down approach, where everything is lead from the fists. Having done so, they must then build up relaxed structure from the ground / feet up. Importantly, in article 2 we looked at the importance of stabilising and ‘sinking’ the elbow. This article continues this learning by looking at the stabilisation of the wrist in connection with the stabilised elbow.
As such, it is likely that this article will be best read and the learning most valuable only once the developing student has aligned all the major joints up to this point – namely, the ankles, knees, hips, shoulders and elbows. This provides the next step in the process – which is to take out unnecessary muscle use in the forearms and provide relaxed structure into the hands.
Basic anatomy of the forearm
This article is not intended to go into great depth into anatomy, or physiology – rather, it just introduces the key muscles involved in the forearms / wrists / hands that are vital to the correct application of relaxed structure in Wing Chun.
Below is a visual overview of some the main muscles located in the forearm that control the wrist / hand, most of which we will cover in this article.

Moving away from muscles tension
Most Western men when they take up in Wing Chun start from a position of using muscle to attack / defend an attack from an opponent; specifically, using tension in their fists, forearms and other muscles – this, in principle, is like hitting the opponent with an iron-bar. For a muscular fighter this approach will be powerful, but an opponent with less muscle will be at a disadvantage. The principle within Wing Chun is that a smaller fighter should be able to defeat a larger, stronger opponent. After all, Wing Chun was originally created as a lady’s style – allowing a woman to defend themselves against a larger, stronger male opponent.
To achieve this, it is necessary to shift from using our muscles and skeletal structure in the way we are commonly used to. Instead, Wing Chun allows us to use a much larger force – one that can be generated from the whole body through relaxed structure connecting the arms, body and legs. Instead of an iron bar (where the arm is tight with muscular tension), the feeling of relaxed structure applied through Wing Chun in the arms / hands is more of a ball (fist) on a chain (forearm) attached to a pole (upper arm).
Taking the fight (tension) out of the hands and forearms involves using the muscles of the forearms / wrists differently, mindful of the weight of the relaxed arm under the force of gravity. This is not an easy task. It is a major hurdle that many students are not able to overcome, and one which blocks any further progress in Wing Chun. The assumption is that the advanced student reading this article is not new to this process and that they have been actively working through this process up to the point of finding a path to relaxed structure in the forearms / hands. Let us now turn to look at tension in the forearms / wrists / hands and how we can begin to strip this out to find relaxed structure.
Relaxed structure versus relaxation alone
If we completely relax under the force of gravity we will simply collapse into a heap on the floor. Our skeletal structure and the muscles, tendons and sinews which allow this to move provides a structure which allows us to operate within the forces of gravity. The same is true if we try and relax against the incoming force of an opponent – our arms crumple and we are knocked back-wards. However, if we tense our muscles then we loose our mobility, and can also be easily toppled. This is the dilemma of relaxation versus structure.
Tension is added into the forearms when the hands are opened from the fist position where this uses the superficial Extensor Digitorum muscle. Instead, using the deeper Extensor Pollicis muscles allows the hands to open from ‘within’ with a feeling that the fingers are like petals that are gently opening like an unfolding flower. As such, the developing Wing Chun student must be attentive to the muscles they are using and be ready to use these differently. Certain preconditions must be in place, however, before relaxed structure can be achieved in the forearms and wrists.
There is a saying in Cantonese “you build a house from the ground up” which means that you need to have built steady foundations for the rest of the structure to rest on. This is very true for Wing Chun. Relaxed structure is only possible when it rests on relaxed structure further ‘downstream’ i.e. here being the elbow, shoulders and back. Generally, by relaxing one part completely, you immediately feel this needs structural support elsewhere. In the case of the elbows and wrists, relaxing these requires the advancing student to have found relaxed structure in the upper arm, elbow etc.
The smooth extension and retraction of the arm in Sil Lim Tao requires the back and shoulders to be in the correct, relaxed structural position. This in turn allows the arms to hang from the shoulders under the natural weight of gravity. In turn, the shoulders and back requires the lower spine / pelvis and legs to be in the correct structural position.
Having achieved this, it allows the elbow to swing easily forwards and backwards like a pendulum. However, this also brings the wrist up towards the face, unless this motion is directed towards the centre of the opponent. A critical factor in allowing this to happen correctly is the application of subtle, relaxed structure in the wrists.
Using all the muscles together, the beginning student, locks the hand and the forearm together (as an iron bar), also using the muscles of the shoulder – the result that the muscles act as putting a brake on the forward motion of the arm, limiting the impact force into the opponent. As the developing student isolates the shoulder and becomes apply the forward motion of the arm towards the opponent from the feet / waist instead, they must then find how to correctly apply allow the forearm and hand to find relaxed structure.
If the hand is completely relaxed (floppy) this is not tense, which is good, but it lacks relaxed ‘structure’. It is just relaxed. As such, the hand cannot be used without causing damage to the hand / wrist. For example, delivering an unstructured fist / wrist with the power Wing Chun can generate will damage it. However, starting from a completely relaxed state is a good starting point to add in structure – rather than starting from a position of tension and then trying to strip this out.
Building relaxed structure
Let us examine how to move from this relaxed state to then find relaxed structure. As you work through the following, try it for yourself and see how it feels. In the ‘floppy’ state, the hand will be open with fingers hanging down (in a palm down position), partially curled up in a half-fist type position (in a palm up position) or, rotating your arm half-way so you palm is side-facing, is a partially curled up half-fist type position. If you find your fingers are pointing outwards rather than slightly curled up then you are holding tension in the fingers / hand. Practice relaxing these until this becomes second nature.
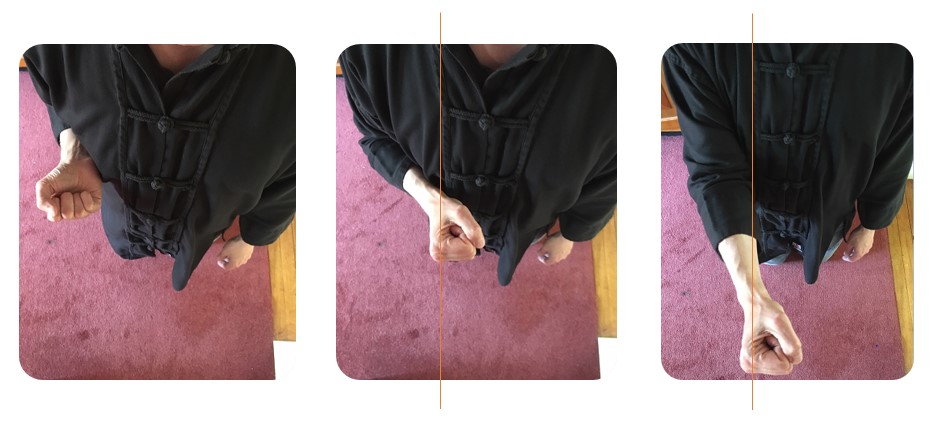
In the Taan Sau (receiving hand) technique, for example, if the beginning student takes the relaxed palm-up position described above, they will then (typically) start with their hand ‘hanging down’ so that the angle of the palm is pointing down towards the floor by around 5 degrees (See photo 1 below), rather than horizontal. Photo 2 shows the hand with the wrist stabilisation and alignment applied, but without the opening of the fingers. Photo 3 shows this with the fingers ‘opened’ and this sharpens up what was already a pretty horizontal palm. The new student will then use the Extensor Digitorum – a superficial muscle of the forearm to extend the fingers of the hand to form the ‘Taan Sau’ shape. This causes tension in the hand, which is shown in Photo 4, which results in the focus of the energy and power of the arm now targeting up more towards the opponent’s face, rather than along the centreline into their core.

In doing so, this adds tension into the wrist and forearm – again, creating an ‘iron bar’. It also means that the palm angle will have passed through the horizontal position and will now be pointing upwards by around 5 degrees. If they then move their arm forwards it follows this angle and the line of force extends from the elbow towards the opponent’s upper chest / neck, rather than straight into their ‘core’ (a centre point between their nipples). Any force coming into this arm will knock it backwards and upwards into the student’s own face or require other muscles to try and counteract this.
The important thing for the developing student to understand is the position of the wrist travelling from the (just off) centre of your chest towards the opponents (centreline) will move out of position, following the wrist – as if it is a steering wheel giving direct to the course of the arm. In practice, the beginner student will engage other muscles to correct this – generally correcting the position of the hand as it travels through space, which invariably means engaging the shoulder muscles. The result being, that they will easily be knocked up and backwards by any structure it encounters.
Isolation, stabilisation and alignment
The correct application of relaxed structure in the wrist and forearm involves three elements – isolation, stabilisation and alignment.
Isolation
In the example above, the whole hand and arm muscles were switched off – this is different from isolating individual muscles. The beginning student, when flexing their wrist (starting from a horizontal palm up position and ending up with the palm vertical with the fingers pointing up) will use the Flexor Carpi Ulnaris, the Palmaris Longus and the Flexor Carpi Radialis in this action. This same grouping of muscles will be used for created the Taan Sau technique. This locks the hand into a rigid, fixed position (See photo 4 above), not allowing it to adduct and adduct i.e. have the palm stay on the horizontal line whilst allowing the wrist to turn to point the fingers inwards / outwards. This is because the Flexor Carpi Ulnaris and Flexor Carpi Radialis are also used for adduction and abduction.
The advanced Wing Chun student can isolate these Flexor muscles, so that they use the Palmaris Longus muscle to counterbalance the downward force of gravity so that the palm is slightly rotated upwards so that it is held horizontally. They are then able to adduct and abduct the wrist. They are also able to flex the wrist from the horizontal position (held by the Palmaris Longus) using the Flexor Carpi muscles to point the fingers upwards, then relax these whilst keeping the Palmaris Longus ‘switched on’ so that the hand drops back down in the relaxed structural starting position of the horizontal palm, as compared to the beginning student whose hand would return to the ‘floppy’ position with the palm pointing 5 degrees down towards the ground.
If you are struggling to feel these muscles ‘from within’ i.e. feeling the activation and motion of specific muscles internally within your own body, then it can be useful to use your fingers to trace the position of the muscle(s) on your arm / wrist. Then when you try doing the technique, you will be able to feel those muscles working. Another trick is to feel these working on an advanced Wing Chun practitioner (your Sifu or a training partner) who can use these correctly.
Now, having isolated the Flexor muscles we have been able to find the correct alignment of the wrist inasmuch as the palm is how horizontal – therefore focusing the energy from the Wing Chun student into the opponent’s ‘core’ rather than diverting off at different angles. This leads nicely to a more detailed analysis of the importance of alignment.
Stabilisation
However, without stabilisation this isolation results only in partial alignment. This can be shown in an example from where we left off before – if the developing student who has been able to employ the isolated Palmaris Longus muscle under the relaxed weight of gravity to make the palm horizontal uses the Pronator Teres muscles (turns their palm to face down) the hand ‘flops’ down with the fingers ‘hanging down’ – this is because we had ‘turned on’ a muscle on the front part of the forearm (Anterior) but we had not balanced this out by turning on anything in the back part of the forearm (Posterior).
Although it did not feel we needed to, because the force of gravity was keeping the structure in place, the wrist was not stabilised and – as we have seen – when it moves between positions this would mean that the different muscles would need to be engaged which is too much for the brain to cope with under the pressure of a fight situation. As such, the aim is to find a balance in the wrist across all four points – bottom, top, left and right.

If we continue with the above example, the advancing Wing Chun student can feel they are engaging the Palmaris Longus – it feels like someone is touching them on the outside, in the centre of their wrist (shown above as the Palm-side stabilisation point). The counterbalance comes from now using the deeper Extensor Pollicis muscles to open out the fingers / thumb and then lightly engaging the Extensor Digitorum muscle. This now gives the feeling of someone else touching the bottom outside centre part of your wrist (shown above as the Rear stabilisation point). Now, two of the four parts of your wrist have been isolated and stabilised.
These first two parts are connected with the motion of Flexion and Extension (flipping you palm up and down), the remaining two components (Left and Right stabilisation points) are connected with Adduction and Abduction (moving the hand to point slightly inwards and outwards. Again, try this out so you can ‘feel’ this for yourself. Again, practice each of these steps until you can ‘feel’ them and can replicate them with ease before attempting to move onto the next step.
Strikes using the hand using Adduction and Abduction are used in the 3rd hand-form of Wing Chun, Bil Jee. These are generally the movements associated with the ‘Snake’ style – where the hand seems to move like the head of a snake waving from side to side. As such, it is recognised that this ability is advanced. However, this is needed for re-focusing the Taan Sau in Sil Lim Tau, and – the focus for this article – in the stabilisation of the wrist which is required through all the forms. As such, this is definitely something the Wing Chun student must acquire from early on – certainly something that is critical to the correct application of Siu Lim Tao techniques.
The Extensor Carpi Radialis Longus and Extensor Carpi Radialis Brevis muscles (back of forearm on the thumb side) and Flexor Carpi Radialis muscle (front of forearm on the thumb side) adduct the wrist (point / move it away from the body). Alternatively, the Extensor Carpi Ulnaris (back of forearm on the little finger side) and Flexor Carpi Ulnaris (front of forearm on the little finger side) abduct the wrist (point / move it toward from the body).
Importantly, the front and rear forearm muscles are synergistic – which means they work together. They are also antagonists – which means they work opposite to each other i.e. one pulls (contracts) and the other pushes (extends). This is why it is critical to be able to understand what muscles work in pairs and what muscles can work in isolation.
When the palm is face-up the Extensor Carpi muscles on the back of the forearm have dominance with the action of adduction and abduction. Alternatively, when the palm is face-down, the Flexor Carpi muscles on the front of the fore-arm have dominance. This means that whilst the palm is face-up in Taan Sau, the Flexor Carpi muscles can be used to stablise the left (Flexor Carpi Ulnaris) part of the wrist (here under the thumb) and the right (Flexor Carpi Radialis) part of the wrist (under the little finger).
Alternatively, whilst the palm is face-down, in the Biu Sau (thrusting fingers) hand position, the Extensor muscles can be used to bring the palm from a ‘floppy’ position of the hand and fingers hanging down, to instead be aligned with the line of the forearm. Again, this avoids adding tension in through using the Extensor Digitorum muscle. This allows the abduction and adduction muscles to be isolated, here with the Flexor muscles playing the dominate role, so that the hand can still be pointed inwards and outwards in this Wing Chun hand position.
Now the Wing Chun student should feel two addition points within the wrist – again, as if they were being touched on the outside of the arm on either side of their wrist just below the hand itself (shown in the diagram above as the Left and Right stabilisation points). Combined with the earlier two points, the advancing student should have mindfulness of a feeling of a triangle or oval shape intersecting these four points. Over time the advanced Wing Chun student can mindfully visualise this and mentally track this rotating in and out of the correct, relaxed structured position.
There is a simple way to test this – get you hand into the Taan Sau position, using your other arm turn your forearm 90 degrees so that you hand is in Man Sau position. The hand should remain stabilised and there should be no movement in the wrist, with the hand not hanging ‘floppy’ from the wrist. Turn it 90 degree again, so that the palm is face-down. Again, the hand shape will be maintained by the relaxed structure of the stabilised wrist so that the hand is already in the Biu Jee Sau shape, rather than being floppy and the hand / fingers hanging down.
Having moved to a point where the advancing student has been able to isolate the muscles in the forearm and wrist, and to then stabilise the wrist the final step in the process is alignment – the focus of the arm into the opponent’s core.
Alignment
The beginner student places their arms into the structural positions mimicking their Sifu. In doing so, they are using the Deltoid muscles in the shoulders which raises the centre of gravity up to the shoulders and requires the arms to deal with any incoming force through these smaller muscles. The advanced student knows that they need to lower the centre of gravity, align their limbs in a relaxed, structured way so that the larger muscles in the back and legs can do 90 percent of the work – which takes the ‘fight’ (and tension) out of the arms.
Moreover, the advanced student has moved on from the basic misunderstanding that Siu Lim Tao is a series of different hand techniques, to instead understanding that the entire form is a continuous motion with the wrist – working with the forwarding through the body and with the natural weight of gravity in the limbs, moves the relaxed structure through the different positions like water flowing along channels into the opponent and around obstacles to these. In this way this advanced Wing Chun Student can apply this relaxed structure across the different hand positions, providing a continuous focused wrist without having to think about getting into these positions on an individual basis.
A key part of this is the alignment of the wrist ‘clipped’ into position on the centreline, so that only the forwarding motion through the bodily structure from the ground and then relaxed motion under gravity are required to move the arm / hand between the main positions of the Sil Lim Tao form. This feeling of being ‘clipped’ into position can be visualised like the wrist and the elbow have small wheels attached to them which sit into a track – the wrist ‘clips’ in when the wrist moves into place in front of the body.
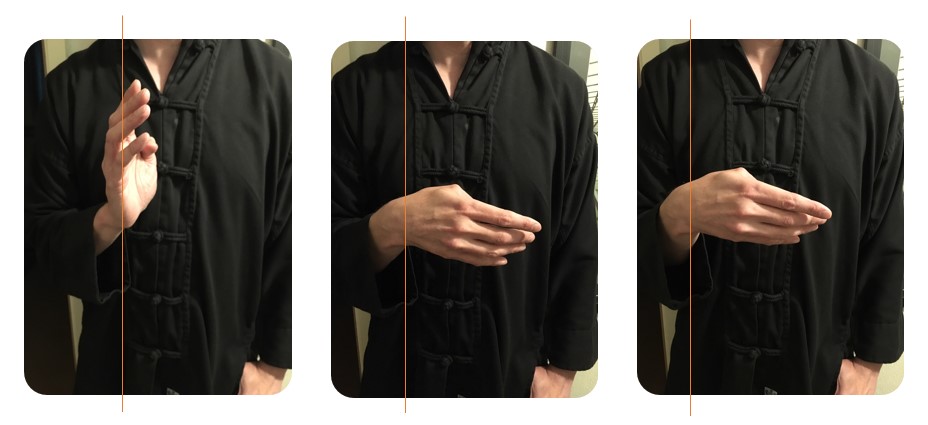
As shown in the pictures above, the hand moves from the initial chamber position (at the side of the body, but not resting on the body in photo 1 above) – which I refer to as position 1 – into position 2 (see photo 2), where the wrist comes in front of the body. Importantly, the arm is relaxed with the stabilisation in the wrist along with the relaxed structure in the shoulders and back, means that it can just hang (under the natural weight of the arm) in this position. The wrist is then moved along the horizontal centreline in towards the opponent’s core to position 3 (see photo 3).
Here we see positions 1, 2 and 3 from a front-facing perspective:

Importantly, the wrist does nothing as it moves between position 2 and 3, other than mindfully maintaining the internal stabilisation within the wrist. This keeps the wrist ‘clipped’ onto what feels like a train-track that extends from position 2 to 3. Where the stability in the wrist is lost, then the wrist can end up going off track – generally a ‘floppy’ wrist tends to follow an opponent’s arm ending up sometimes many centimetres off to the outside. Alternatively, it can follow the line of the arm and end up deviating upwards, again by a number of centimetres.
A good exercise to test this relaxed structure in the above example, is to work with your Sifu or a training partner. Start by getting into your relaxed structure and move from position 1 (Chamber) into position 2. Mindfully engage the stabilisation in your wrist and ensure that the shoulder and back are correctly into position to allow the ‘heavy elbow’ – where the elbow feels like it is being pulled down towards the ground by gravity, and the shoulder feels like the weight of the arm is pulling the shoulders away from the neck. Allow your Sifu / training partner to pull your fist away from your body – if you have maintained your relaxed structure, this will move to position 3.
Conversely, when your Sifu / training partner releases your hand from position 3, the natural weight of gravity should allow your arm to return into position 2. Here your wrist should travel back along it’s tracks and end up still ‘clipped’ on in the original position. Where the wrist stabilisation is not maintained the relaxed arm will just drop backwards, tracking the triangulation line of the elbow and end up near the hip. Keep practicing this until your arm can move out and back between these positions using only relaxed structure, with the focused stability of the wrist keeping the wrist, elbow and whole are flowing forwards and backwards with no tension in the wrist or forearm.
Further examples of alignment – Huen Sau, Fook Sau and Bong Sau
This relaxed structure is maintained as the hand moves through other different shapes – for example, as it circles through Huen Sau (circling hand). This stabilised, relaxed structure ensures that the wrist stays in the same point in space. Without this, the beginner student’s wrist will often be pulled offline and make a circular motion itself – losing the structural control of the line into the core and allowing a well-structured opponent to take control of the centreline.
Another example is the Fook Sau (tame-force hand), where the beginner student allowing the hand to ‘flop’ with just relaxation from the Maan Sau (Guard hand) will often allow the falling action of the hand to move the wrist backwards and upwards, again conceding the structural advantage by taking the wrist from the optimal position within the ‘triangulation’ of the arms into the opponent – as shown above in photo 3.
Using the correct alignment and stabilisation of relaxed structure the advanced student rotates the 4 points (mindfully understood as the internal wrist triangle or oval shape) 90% to rotate the relaxed palm to face towards the body. As shown in photo 2, this maintains the wrist in the same place, rather than the ‘floppy’ wrist in photo 3 which is 3 centimetres out of the original position.
If the student maintains the wrist alignment and stability and allow the weight of gravity to allow the hand fall, the line of structural power (triangulation) passing through the wrist extends along the line of the ‘bone’ (the forearm) and upwards and outwards – not focused on the core of the opponent. The adjustment to the alignment of the wrist – the 90-degree rotation – ensures that the wrist is targeting the opponent’s core again with this power of the elbow (alignment) behind it.
The Bong Sau (wing-arc hand) is another example where the beginner student will struggle to find the correct relaxed structure, generally having to place the arm into what they perceive as the right position. Here the wrist often clearly seen to end up in a variety of different places relative to the original Tan Sau wrist position. Again, with the apex of the ‘triangulation’ of the arm moving off the line of attack into the opponent (power line) then this can easily be opened up exposing the students’ own core to a structurally superior opponent.

In this particular case, the Bong Sau will transition from the Taan Sau, with the stabilised relaxed structure in the wrist maintained throughout, ending with the wrist rotating through a 270-degree arc but remaining in the same physical place in space. In the pictorial example above, the first and second photos show the wrist stays in the same position as a result of the stabilised alignment, whilst allow the wrist to be ‘floppy’ takes the wrist position a considerable a good 3 centimetres upwards, and out of position.
When the stabilised alignment of relaxed structure is found in the wrist in the Taan Sau, the forwarding application of the arm means that the transition into the Bong Sau and all other hand techniques is no longer a series of individual techniques but a continuous flow. This takes the beginner student to an advanced position where the energy from the ground can flow like a single current of electricity through the aligned, relaxed structural key joints into the opponent with a focus on the whole-body delivery, rather than the physical placement of individual arm placements / hand techniques.
When the stabilised alignment of relaxed structure is found in the wrist in the Taan Sau, the forwarding application of the arm means that the transition into the Bong Sau and all other hand techniques is no longer a series of individual techniques but a continuous flow. This takes the beginner student to an advanced position where the energy from the ground can flow like a single current of electricity through the aligned, relaxed structural key joints into the opponent with a focus on the whole body delivery, rather than the physical placement of individual arm placements / hand techniques.
The key to maintaining the alignment through these techniques is to ensure that the wrist is maintained ‘clipped’ to the centreline through the entire transition of the arm. As the arms moves through pronation and supination (rotation of the palm to face upwards and downwards) it is important that the four stabilisation points in the wrist can move, but only rotating through the mindful oval shape. This will keep the wrist always focused towards the opponent’s core and to always end up in the correct relaxed structure positions (for example when dropping out of Fook Sau into Taan Sau) ready to then exploit any weakness in the opponent’s structure and actively seek out their core to deliver a strike.
Keeping the wrist ‘clipped on’ initially requires the beginner student to look and check the spatial placement of the wrist each time. For the advanced student, this means mindfully keeping relaxed structural integrity and allowing their limbs to correctly flow through the different techniques. It means that the correct relaxed structure is maintained through the feet, knees, hips/pelvis, spine, shoulders and elbows and wrists. This is maintained by using isolated, correct muscles across each area. Specifically, within the arms this means allowing the relaxed controlled stabilisation of the elbow in the same way that the stabilisation occurs in the wrist, in a coordinated singular fashion with the wrist and elbow moving together to flow through the relaxed triangulated structure.
Embedding the learning
As with everything else in Wing Chun, having stripped out another layer of tension – here in the forearms and wrists – you will need to train this in through the hand-forms to programme this into your brain so that you can do this 100 out of 100 times. Initially, you will get the light-bulb moment where you ‘feel’ this for the first time and then – bit by bit – with concentrated effort to begin with, increase the frequency of when you can find relaxed structure in the forearm, wrist and hand.
Craig Sands 2019

You must be logged in to post a comment.