| Read Time: 1 h 3 mins 43 secs |
An introduction to the article and the series
This is the second in a series of five articles which are intended to provide an insight for the developing Wing Chun student in an area that typically is very confusing.
In the first article, The Relaxation versus Structure dilemma and the use of gravity in Wing Chun (1), we introduced the seemingly dichotomy faced by the beginning Wing Chun student – the dilemma of how to develop structure through relaxation. We also indicated that most articles you find cover either one or the other, as if they were somehow mutually exclusive, but how these are in fact necessarily linked – namely, relaxation is only possible through developing the correct structure, but that it is not possible to develop this structure without relaxation.
We suggested that the solution to break out of tautological dilemma is in how Wing Chun makes use of the essential role of gravity. This will be explored further in this article.
The focus of this second article
In this second article in the series, our focus is on understanding correct Wing Chun posture – specifically, what the correct posture should look like.
The scope of what we hope to cover in this article is deliberately limited, as each of the articles is intended to build on each other in a structured way to introduce new understanding one step at a time. This is also required because there is much to learn in Wing Chun – although it is easy to pick up and use as an effective fighting technique because of its relative simplicity and limited number of techniques compared to other Kung Fu styles, it takes a great deal of time and effort to master the intricate, refined use which makes it a truly devastating martial art.
What we intend to cover here therefore is limited – to introduce the critical components of the Yee Gee Wing Chun stance and to highlight the key areas of structure. In particular, the starting position is to begin to explore in more detail the visualisation below, taken from the article Understanding Structure – Sil Lim Tao Stance.

Here we see a picture of Grand Master Yip Man standing in the Wing Chun basic stance position, with a series of Cantonese terms surrounding him which describe the different areas we must concentrate on to hold the correct structure. Typically, this structure takes many years to find through the passing down of a ‘feeling’ from Sifu to Student – as Wing Chun is an ‘internal’ martial art that requires the developing student to re-programme their body and mind. However, it is possible to provide a helping hand in understanding this, and this is the aim of this series of articles.
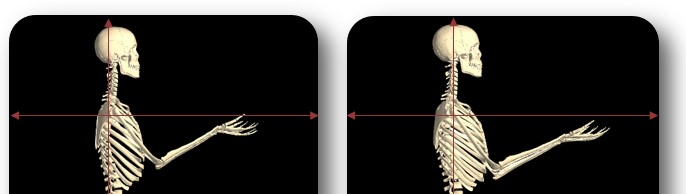
The method this article uses to achieve this is to understand the internal physiology in a simple way, using the two images below – one showing incorrect posture (on the left, which we will call the ‘before’ position) and the other showing the correct posture (on the right, which we will call the ‘after’ position).

This article does not go into complicated anatomical, physiological and neurological terminology and depth – although this becomes more important later in refined mastery of Wing Chun, this is not required here. Instead, just a basic comprehension of the skeletal structure and main joints in the body is all that is required for now.
Indeed, it is quite easy to get caught up in the introspective internal investigations and lose sight of the fact that this is a fighting art – and that ultimately you are potentially facing an attacker in a fight situation. As such, I would always encourage you to balance out your training – with focus on the internal breaking down of the structure and finding relaxation, but also give equal time and attention to training with a partner, sparring etc. The focus of this article, though, is 100% on the internal introspection aspects.
If you have been in a Wing Chun class for a while, you will quickly get used to your Sifu and fellow students feeling different parts of your body to check for positioning and muscular use – this is because we are not equipped with x-ray eyes and cannot see what is going on inside the body. As a beginner student you may never have given much thought to your normal standing position and how your body works in a structural way – this is something that will need to change if you want to develop relaxed structure.
In fact, to begin breaking down the ‘before’ position you need to start to build up an internal mental image of what is where and how each bit is working. Having built up this internal ‘before’ picture we can then begin breaking this down and exploring each part to ‘feel’ how this is different. Again, it is necessary to emphasise that understanding how the ‘after’ structural position can be achieved using relaxation and the natural weight of gravity in the body will be explored in the remainder of the articles. The focus here is just to understand the ‘what’, not the ‘how’. If we at least have an understanding of what we should be moving to, this helps us focus our training to achieving this.
In the third article, we will explore why relaxing proves so difficult and look at exercises on how to achieve this. The fourth article will explore the concepts of ‘rootedness’ and ‘forwarding’ – the sinking and springing effect that correct relaxed structural posture achieves in creating a whole-body unification. Finally, the fifth article will provide some exercises and insights into how to achieve this relaxed, structure posture using gravity to minimise muscle effort.
It is also important to note that we limit ourselves to the structural position of Sil Lim Tao basic stance, Yee Chi Kim Yeung Ma. This is the foundation of all the later forms and understanding this involves a great deal, without having to then further understand moving the stance using the different stepping techniques introduced in the second form, Chum Kiu. Achieving relaxed structure in the first form underpins the later use of this to generate power through movement later. A whole separate series of articles would be needed to cover the additional relaxation required for this to happen, something which is more advanced and would only complicate things further here and now.
What we will need to introduce is the importance of moving between techniques and not just a series of static positions. The ‘before’ and ‘after’ positions above are not different static positions, instead the ‘after’ position is only possible through a flow of movement to move from the first position into the second position. This will be covered in the following articles, as this continuous flow of movement is the key to ‘how’ relaxed structure is achieved.
A structural approach and a word of caution
Now, before we start, a word of warning – despite the content of this article being deliberately limited and having the different structural components effectively laid out on a plate for you, do not be fooled into thinking that this simplifies the process of being able to translate this into being able to do it. Given there are a dozen or so key elements covered here doing the maths should give you some idea of how long it will take to understand each individual one and bring these together – the answer is likely many years.
I cannot also stress enough the importance of working closely with your Sifu to help guide you through this process. On paper, it can sound quite simple – however, each of these can take weeks or months to achieve by a dedicated student putting in many hours of dedicated introspective practice. It is easy to wander from the path – even if you approach it with the structured way proposed in this series of articles. Ultimately, although only you can walk this path – however, your Sifu can keep you from wandering too far from the correct path.
I often think that learning Wing Chun feels like a game of Snakes and Ladders – there are times when you feel that you are going slowly and working hard for every step forward, sometimes you have a big breakthrough and climb a ladder, but there is always the snake that makes you feel like you go right back to the beginning. This is a natural part of making breakthroughs in understanding and then having to embed this learning back into other areas of your training. Your Sifu has worked through this themselves, there is no escaping it, and when the frustration kicks in and you hit the training walls that will come often, this is where you need someone you trust to help you along the way – providing also the emotional support you will need to transform from an everyday person in the street, into an effective Wing Chun fighter.
The key message that I want to make clear in this article, is to convey the importance of stripping back the ‘before’ physiology (i.e. how we normally stand and how we start out as beginner students in Wing Chun), breaking this into different parts to understand and develop it before then reshaping these by building everything back together to make the whole-body unity work in a new way – the ‘after’ picture that we are seeking to achieve.
This article lays out each of these component parts, setting them out as stepping stones on the path that you will need to master – giving you an initial insight into what the path looks like and the steps that you will need to take along the way.
Again, I must reiterate, this will not be straightforward, and many reading this article will, unfortunately, not make the full journey. It has taken me many years to walk along this path, break down my original physiology, work through the individual structural jigsaw pieces and to combine them together into a relaxed Wing Chun structure. Only the dedicated who are prepared to train hard and those will resilience and persistence to break through training walls will make it. But it is worth it!
Understanding Yee Chi Kim Yeung Ma
The basic stance of the first form is where it all begins. The face of each and every new student who begins Wing Chun always reads the same – that initially (indeed, for a long time) the Wing Chun basic horse stance (called Yee Chi Kim Yeung Ma) feels very strange and alien for them to be in. Indeed, it is very hard to believe at this early stage, that this weird position which seems very unbalanced and stiff can move in the relaxed, free-flowing but structurally powerful way their Sifu demonstrates.
This is a feeling that does not change over-night, indeed, it will take weeks, months or years for your stance to get into a position where you can achieve this relaxed, structural power with free movement. Having seen it performed by their Sifu, the beginning student can only trust that their teacher can help them achieve the seeming impossible also and replicate this.
Now, this is where the beginner student typically starts – to try and replicate what they have seen their Sifu do….or what they have seen Bruce Lee or the Power Rangers do. The result is not a pretty sight! But, this is where we must all start as humans – we learn through mimicking behaviour. Unfortunately, as the beginner student cannot see inside the Sifu’s body, they are not able to see how they use their muscles, sinews, tendons and skeletal structure in a completely different way. The mimicking is therefore based on what is perceived from the outside. And, for all intents and purposes, the beginner student can replicate the moment – in the sense of performing ‘dance’ movements that copy those of the Sifu. To the untrained eye, the internal structural position of the ‘before’ picture does not look that much different from the ‘after’ picture. The answer is, actually they are not that different – but the developing student soon comes to realise that in Wing Chun small changes make big differences.
Indeed, one of the first training walls that a beginning Wing Chun student must face is, having learned where to put their arms in the Sil Lim Tao form and having got into what they thought was a reasonable stance, under the pressure of an attack this all breaks down and they are quickly destroyed by their Sifu. Now the beginning student quickly realises that what they are doing is not the same and this is where the real journey starts…exploring what is going on inside that actually makes all the difference!
This article is therefore intended for the developing Wing Chun student who has worked through the Sil Lim Tao stance and is familiar with the positioning of the whole form, but who has realised that now they need to take this to a new level. Indeed, they have got to the point where they realise that they lack the internal structure and relaxation that they have felt in their Sifu, and they are actively seeking to strip out all the muscular tension and unnecessary use of force. There is no set amount of time it takes the new student to have this moment of realisation – it may be weeks, months or more…but this is where all the fun starts!
A critical saying provides a guiding principle for how relaxed structured is to be achieved in Wing Chun – Lik Chong Gerk Jang Sang – power originates from the heals – meaning structural power through the alignment of the 6 major joints. The first point to take from this is that power comes from the ground – this is a really important ‘principle’ that the developing student can keep in their mind as they begin the process of actually completely reversing how they are applying structure – from an initial starting approach of leading from clenched fists, with tight forearms, held from the shoulder with a loose waist and over-balancing their centre of gravity i.e. so if the punch misses they go flying forwards off-balance.
Here the fist, arm and shoulder are fully committed, rotating the upper body slightly. If this punch was delivered at full speed and the opponent moved out the way, it is highly likely that the puncher would stumble forwards and lose their balance. This type of punch uses a lot of muscular force, but lacks any real structural power.
A key principle in Wing Chun is to disrupt the opponents balance, but to preserve your own. Another key principle in Wing Chun is that it allows a smaller person to win against a larger opponent. When a punch is delivered using muscle power alone, then the bigger, stronger person will win – hence why the structural position to deliver a punch or block in Wing Chun is necessarily different. This difference is made possible through a structural transition in how we deliver an attack and receive one. This requires looking at how we can maximise the delivery of force and stability using – generally, as humans, we all have but 2 arms and two legs, but we can refine how we use these to our advantage.
From Muscles to Joints, Tendons and Sinews
Refining the physiology in Wing Chun extends much deeper than the six major joints typically referred to as the critical elements involved in Wing Chun – namely, the ankles, knees, hips, shoulders, elbows, and wrists. However, these are the key joints and are a good starting place to begin to understand the reconfiguration of the structure to deliver and receive force.
The key thing to understand here is that the first stage of transition is to step back from using muscle alone, and instead move to a more natural position where we can allow the natural structure of our bodies to work. Where muscle force is used, this is counter-productive to the way our bodies naturally work most efficiently.
The process of moving to relaxed structure is therefore one of actively identifying tension in the different areas within our bodies and, slowly but surely, striping this out. For example, tension will invariably be found in the fist, in the forearm and shoulder, effectively locking the arm up and stopping this from moving through its whole range of motion in a relaxed way. It is not possible just to strip something out from the body – instead, it is a case of using the natural skeletal structure, the joints, tendons and ligaments in place of holding tension in muscles. The transition will be covered in the later articles, as this is starting to get much deeper into the investigation of finding relaxed structure through the natural weight of gravity.
It is important to understand that this does not mean that muscles are not used in Wing Chun at all, as this would not be accurate. Indeed, just the process of standing up requires us to use a multiplicity of muscles all over the body. However, the process of standing or walking is one that the body has become very accustomed to, and the muscles involved are used to providing structure but in a relaxed fashion – for example, we are able to walk in a fluid way, rather than wobbling side-to-side in a stiff robotic type fashion. This all comes from the core structure, rather than the external muscles which are incorrectly used to override the core muscles – resulting from poor posture and a lack of understanding of human physiology in the modern western world. An equally big part in finding relaxed structure is in changing which muscle groups, or muscle types we use. Again, this is something that is important to raise here so that this is in the mind of the reader now, but will need to be addressed separately and in more detail later in this series of articles.
In addition to the 6 major joints I include the spine, and neck as key skeletal elements necessary to understand. Indeed, despite the focus of developing power through the six joints, the key Cantonese terminology is not specifically focused on the joints, although these are covered descriptive terms used to describe the transition to correct, relaxed, structural positions of the limbs and torso. This is why a great deal of attention is provided to the concept of triangulation within Wing Chun literature.
Triangulation as a source of structural integrity
The concept of triangulation should not be something new to you – it has been covered extensively in several key books and articles on Wing Chun structure. However, any discussion of Wing Chun structure must necessarily touch on this.
The aim here is not to go into great detail – as again, this delves into the ‘how’ rather than the ‘what’. The focus here is simply to introduce this from a structural integrity point of view and to point out how the different joints are put to work in a new way – in the transition away from the use of muscle.
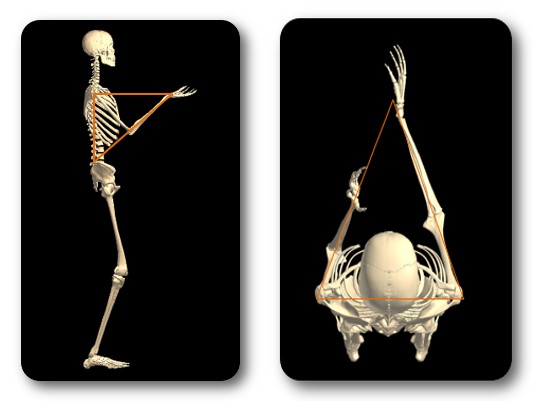
In the diagram below, we see two triangles marked out on Grand Master Yip Man.
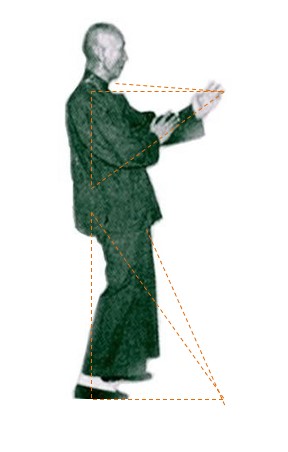
The first thing you should notice is that these are not triangles – instead they are triangular pyramids, or tetrahedrons. The structure formed is a three-dimensional one, and not a two-dimension one.
You should also notice that there are two triangular pyramids – one formed in the lower body, and one in the upper body. These triangle shapes are formed through the repositioning of the limbs in the Yee Che Kim Yeung Ma stance. A key part of being able to use this structure to defeat a larger opponent is to move beyond using individual limbs, or smaller isolated muscles, to instead using the whole body – using everything together to generate a gestalt force. A critical part of this is uniting the lower body triangular pyramid structure with the upper body triangular pyramid structure. This is achieved through the pelvis – the intersecting point where the two structures meet in the center of the body.
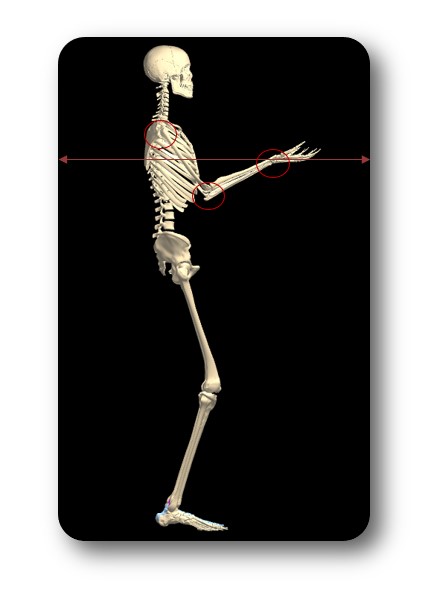
It is important to notice that the top triangle is comprised of the shoulder, the back, the neck, the elbows and the wrists. This is the vertical structure that allows the arms to extend forward. This structure provides a ‘wedging’ effect, that allows the Wing Chun practitioner to control the vertical centre-line; allowing them the shortest route to attack whilst the opponent is forced to take a slower, longer route around this structure. Again, this is the basis of key Wing Chun principles, which will be explored in more detail in the later articles.
Below we see the triangulation of the back, extending from the base of the spine up to both shoulder-blades and across the line of the chest.

And here we see the triangulation from the front perspective showing the positioning of the legs.
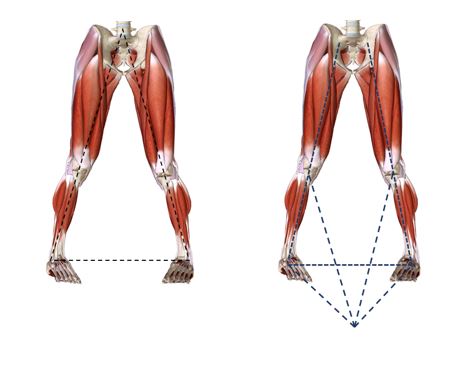
On the left we see the basic triangle extends between the centre point of both feet and then extends up on each side through the line of the knees into the apex in the pelvis area. On the right, we see the angle formed through the legs in a sunken position, with the feet turned in at 45 degrees, and the transition of the center of gravity off the heels to the center of the feet, creates the three-dimensional triangular pyramid, which provides a strong structural base position.
Although it is tempting to dwell on this subject, as this area warrants a much deeper analysis and understanding, it is important to only introduce this here. Sticking to the path we are deliberately walking through this series of articles will mean that this should start to become clearer as we build up our understanding in other areas. However, please do take time to get into your basic stance and build up a visualisation in your mind of this structural shapes formed by your body. It would also be beneficial to keep this in the back of your mind and give thought to how each of the individual elements we cover below play a part in creating these structures.
Starting from the ground up
An analysis of structures around us, such as trees, houses, sky-scrapers etc, teaches us that a vertical structure must have a solid foundation otherwise it is easy to topple over, under the effect of gravity. For example, a tree will often have an extensive root system which expands out below the ground the same radius distance as the upper part of the tree to counter-balance it and give it the support it needs. It is no surprise then, that many of the concepts and terminology in Wing Chun reference back to nature, or these natural forces – such as rooting, yielding etc. It is certainly true for the Wing Chun stance that without a solid foundation the rest of the structure literally topples.
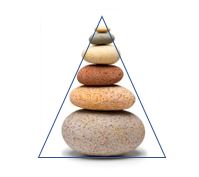
Attempting to build a stack of stones reminds us of the importance of the structural significance of triangulation. In the picture below, we see that the large, heavy stones are at the bottom and these progressively get smaller and lighter as they are piled on to construct the tower.
The same is true for the human body – in the vertical structure the most powerful, larger muscles are in the legs. These muscles are much more powerful than those of the shoulders, the upper arms, fore-arms and wrists. It therefore makes sense to use these bigger muscles – using the legs to deliver the major part of the force into the opponent and a minor percentage through the shoulders, arms, wrists etc. The same goes in the reverse – for receiving incoming force into the body from an opponent’s attack; this should not be fought away in the hands or arms, but instead allowed to be received into the body so this can be absorbed through the body and handled through the larger leg muscles. This is the importance of starting from the ground up – reversing the initial feeling of leading from the hands and from the shoulders.
Another important lesson that can be learned from stacking stones is that each stone must be securely in place before you then add the next – if there is a weak link in the lower stones, then adding more weight higher up the tower will accentuate this weakness and the structure becomes quickly unstable and likely to topple. The same is true in the Wing Chun stance – it is not possible to correctly use the structure in the upper body to disperse the force of an incoming attack if the structure of the lower body is not correct. This also applies further to the individual elements that comprise this – for example, it is not possible to find structural relaxation in the arms, until the shoulders have been isolated through relaxed structure, which in turn cannot be achieved until the upper back structure has been achieved, which in turn cannot be achieved until the lower back structure has been achieved – and so on, all the way down the structure to the ground.
What this looks like in the Wing Chun stance, is pretty much like what happens when building a stone tower gets unbalanced – namely, the person building it must stabilise the stones by holding them from the side. In terms of the human body, this means using other muscles to try and stabilise where the larger structure is being compromised by the weight of gravity or the incoming force of an opponent’s attack. This is an unnecessary use of muscle, which we must actively seek to identify and strip out as we refine our structure. In doing so, we focus on only the necessary muscles and this removes tension from those muscles which should not actually be being used in the first place.
Many developing students struggle for years because they fail to understand and apply this in how they attempt to construct their Wing Chun structure. For example, until your structural base is solid then it is not possible to use the correct relaxed structure in the upper body – well, technically it is, but the result is that you end up toppling yourself backwards by your own horizontal forwarding force. At this point the developing student tries to compensate for this structural weakness by loading more into the arms. There are some good practical exercises to test this and to help you progress through this in the final article.
Having worked through each of the different six major joints and now understanding how to achieve the correct relaxed structure, the advancing Wing Chun practitioner will be able to correctly get into the Yee Chi Kim Yeung Ma stance – however, even after many years, this is always achieved through a mindfulness of building the tower one stone at a time. This feels like working through a blue-print for correct structure in your mind – setting up the stance through each of the key sections to build the relaxed structure from the ground up. In doing so, each key position is achieved with the correct structure and stops the unnecessary use of additional stabilising muscles having to be used. In this way relaxed structure involves actively avoiding tension rather than starting with this and then removing it from the stance. For the beginning student, though, actively removing it piece by piece is required. However, starting from the larger foundational pieces upwards means that they can at least build up more and more of this bigger picture and take a structured path to achieving this.
In the following sections we will now begin to explore how the different stones are stacked within the Wing Chun structure – looking in a little more detail each of the structural areas from the diagram above.
These are explored from the ground upwards. However, there is one critical distinction – when opening the stance, we actually start from the middle, which then makes possible the process of working from the ground up. This seems to make no sense given everything else we have said above. To make sense of this, we must first explore the necessary relationship between the horizontal and the vertical structure. This seemingly contradictory, yet critical, first step will then make sense.
Vertical and Horizontal Structure – Centre-lines
So, what is the difference between the Horizontal and Vertical structure? This is visualised in the diagram below, showing the vertical centre-line extending up from the ground between the feet of Grand Master Ip Man, through the center of his body and out through the top of his head.

In Wing Chun, you often here the term ‘centre-line’. What this actually refers to is an imaginary line, or more appropriately, a series of lines – physical planes through which the Wing Chun practitioner moves their limbs. However, there is not just a single line, instead there are a couple which combine with the 6 major joints to describe the structural positions. There are three centre-lines – Jic Seen, Chun Sum Seen and Tse M Seen.
Vertical Centre-line
In Cantonese, Jic Seen translates to ‘straight line’. This is the basic concept of an imaginary line running through the centre of the body, vertically as a rotational axis. So, for example, if we imagine a pole extends up from the ground through the centre of our bodies and out through the top of our heads we would be able to swivel to the left and to the right, rotating in each direction but remaining in this fixed location.
A key principle in Wing Chun extends from this – namely, the idea is to hit to opponent on this ‘core’ line, but to avoid getting hit on yours. You can imagine standing on a rotating disc and an opponent strikes your shoulder. Here a lot of the force will not be absorbed into the body, but instead will spin the plate around and be dissipated. On the other hand, if the opponent strikes you dead-center along this central pole, your body will not pivot in any way and all the force will be taken into the body causing maximum damage to the internal organs.
In addition to these benefits of dissipating incoming force from an attacker, there are also advantages of this rotation in terms of delivering force into an opponent. The rotation of the body allows the hands to be much closer to the opponent without having to move, and the rotation acts as torque – providing additional kinetic energy (the moving weight of your whole body) to your attack.
In Cantonese, Chun Sum Seen translates to ‘central heart line’. This is an imaginary line that is also vertical, but unlike Jic Seen does not dissect the body centrally. Instead, this extends around 2 inches / 5 centimetres on either side of this. This is shown in the diagram below.

Here we see the Wu Sau (Guard hand) on the left is not right in the centre of the chest, but is just off to the left. Again, we also see the Mann Sau (Enquiring hand) on the right also does not come fully to the centre point of the chest.
It is often said that the reason for this is because of this best allows the Wing Chun practitioner to attach all vital organs of the body. From a relaxed structural position, this is where the limbs actually end up – it is the natural position the arms move forward through in a relaxed structure when the upper body (back and shoulders) are correctly set. As such, if you are placing your arms dead centre on his vertical line then you can be sure that either your back / shoulder structure is not correctly set or you will either (1) compromise your elbow position or (2) are placing the arms in position which will then hang from the shoulders – rather than extending correctly out from the body (Fong Song), flowing along the triangular pyramid structural power-lines (Mai Jang) and with the relaxed structural power in the elbow (Jang Die Lik) that allows energy to be absorbed and released from the lower body.
Horizontal Centre-line
The horizontal centre-line extends out from the body from the Chung Sum Seen i.e. slightly on either side of the chest and the hands extend out and up to towards the apex point so that both wrists is on this line. In Cantonese this is called the Tse M Seen, which translates as the ‘Meridian Line’.

When you are training on your own in Sil Lim Tao, this line extends out along a vertical plane from your own chest. However, when facing an attacker, it is important to understand that this line actually connects both of your Jic Seen, and this line therefore travels out in all directions at different angles. For example, if you are facing a much larger opponent, you would not extend your arm forwards as you would in Sil Lim Tao, as this may end up pointing towards their stomach. Instead, you need to realign this to connect the line between your chests.
Again, we see the Mann Sau (Enquiring hand) on the right also does not come fully to the apex point of the triangulation structure. In effect, this feels like two train-tracks that extend out from the centre of your chest. Your left-hand travels along one track and the right-hand travels along another. We can see the wrist stays on the horizontal line as it extends outwards. Actually, the different hand positions (Wu Sau, Fook Sau, Tann Sau etc) are often said to ‘sit on the line’ or ‘sit below the line’, but in all cases the wrist moves outwards along this imaginary line.
Initially the beginner student must get used to placing their arms into this position until they understand how to flow into this correctly from the Chamber position (both arms pulled back alongside the body).
Centre-line advantage
Having the hands and elbows positioned correctly along the centre-lines, forming the triangular pyramid provides not only the optimised structural strength and relaxation of the limbs for flexibility and whole-body utilisation, this also provides a wedging effect to open up the opponent whilst also protecting your own ‘centre’ and forcing the opponent to have to attack around your arms. This is important for a key Wing Chub maxim – Yan Han Gung, Nor Han Yin. This means ‘whilst others walk the bow, I walk the string’. This refers to a bow that has a curved bow, but a straight string connecting the ends. The string provides the most direct route, which means that the Wing Chun fighter will hit their opponent before the attackers punch comes around the centre on a longer trajectory path.
A further key principle here is that with the arms extended forward in this structural position, the opponent has to make contact with your arms to get into the centre. The wedging effect allows this force to be rotated through the stance (through Jic Seen) and dissipated, whilst rotating your body and attach with force into them. It also means that you feel the opponents arm making contact – this is the ‘sensitivity’ that is trained in Chi Sau, where you can then understand what the opponent is doing and how they are attacking you, allowing you to control them and counter this. It also includes a whole lot of other principles such as feeling the incoming attack and receiving this (such as in Lop Sau, or Cross Tann Sau) or to re-routing this (such as in Tann sau). The important thing is that it is a guard between you and the opponent that stops them getting to you, and gives you to best positional advantage to get to them.
The relationship between the vertical and horizontal centre-lines.
The key point to impress here is that it is not possible to find the horizontal structure until the vertical structure is found. This is one area where many of the developing students struggle – trying to achieve upper body structure without having first developed structure in the lower horse. In this case, the student does not have a solid base to deal with incoming force, or to deal with their own outgoing force. They end up knocking themselves backwards, or trying to use muscular tension to fight incoming force and to leverage themselves over.
This is why any system that is loaded from the top will easily be rocked over, and why it is necessary to revise how the body handles this – switching the focus to a stable base with the energy being absorbed down the ‘pole’ of the body.

In the diagram above we see how incoming force, marked by the blue arrow, can be received into the stance. We see the first orange arrow extending back from the point of incoming force in the hands, back into the shoulders, which would result in the top part of the body being pushed backwards and toppling the whole structure. There is where tension is held in the arms and shoulders. The second orange arrow extends down the line of the forearms into the elbows and down the triangular pyramid structural shape down into the waist and legs. This is where tension has been stripped out of the arms and shoulders.
A key element then, in both receiving and delivering force, is to be able to use the vertical centreline structure to transfer this into the horizontal centreline. This is the concept of using power from the ground and it means being able to use the compression of the body under the weight of gravity and an opponent’s incoming force (for example in Chi Sau) to load the body so that it acts as if it were spring-loaded. This spring uncoils, releasing its power up through the vertical stance and, where the connection has been properly made, this then extends along the vertical centreline in the opponent.
It takes a lot of time, attention and practical study to make this happen. Generally, once the developing student has begun to use their legs to sink they will just spring forward into their Sifu / training partner when working on structural tests and the incoming pressure is released. This is because they are still using unnecessary muscles, incorrect muscles or they have not properly unified the upper and lower body triangular pyramid structures. What should happen is that your body should spring up (as if Yip Man were to rise up the pole a little in the earlier diagram), but at the same time the opponent should feel this force coming at them along the vertical centre-line.
It is possible to train the vertical centreline without engaging the arms in the horizontal centreline. This can actually be a useful process, as it removes one area of complication – which is always a good strategy when trying to diagnose a complex issue. In this way, you can strip out other parts that are likely to also have issues, thereby allowing you to concentrate on the specific element or structural grouping that you are actively exploring and developing.
A deeper explanation in this area of how gravity is involved in this process will be covered in the following articles, along with several practical examples to help you feel this for yourself and be able to incorporate this into your relaxed structure.
Unification of the Upper and Lower Body Structure
Although it is possible to break apart and develop the vertical and horizontal structure separately, in my experience the lower body cannot be found independently of the centre which unites it with the upper body. A key part of finding the correct lower stance is in the positioning of the pelvis. This allows the correct positioning of the legs. This is also the area which brings together the upper body and lower body. Indeed, this is the first and most important part of the Wing Chun basic stance that most developing students completely overlook, and do not often appreciate the significance of until much later down their training journey when they are seeking to refine their structure and must then strip things back to the very beginning.
How this is achieved is through the structural elements covered below. In working through these we will begin to make sense of this. However, mastering this is more complicated, and outside the remit of this article. It is sufficient to introduce this and make clear the significance of this. In the later articles will we need to explore this in greater detail to understand how this is refined.
This mirrors how the developing Wing Chun student will experience their progress – it takes time to gradually refine their intellectual understanding of the principles, and even longer for their body to program in these physiological changes so they become natural and seamless, through endless repetition and experimentation, all under the watchful guidance of the Sifu of course!
Whole body unification
Having developed the structure of the vertical centreline (lower-body geared into a solid centre supporting the upper body), it now becomes possible to add in the horizontal structure – namely the wedging effect formed through the triangulation of the arms extended out in front of the body. Only now does the whole-body unification of Wing Chun become possible. And, having made the connection, it will take a great deal of time to actually be able to start to use this in a functional way to attack and defend from the front-facing basic stance. That is without even beginning to add in the complexity of basic shifting, the even more difficult activity of moving the stance around through the various stepping techniques, and then doing this on one foot when including the kicking techniques.
Again, a full understanding of this will come only in time – and the first step towards this is to understand and be able to use the individual structural elements. The important thing to understand here is that using the whole body from a structural point of view is a technical process of bringing together the individual structural elements you have stripped down from the ‘before’ position to find relaxed structure in the ‘after’ position. Then, as with everything else in Wing Chun you can move beyond the ‘technique’ to ‘application’ – being able to use this as second-nature. This is the ultimate end – to be able to use relaxed structure Wing Chun structure to defeat a larger opponent in a conflict situation.
Analysis of Structural Positions
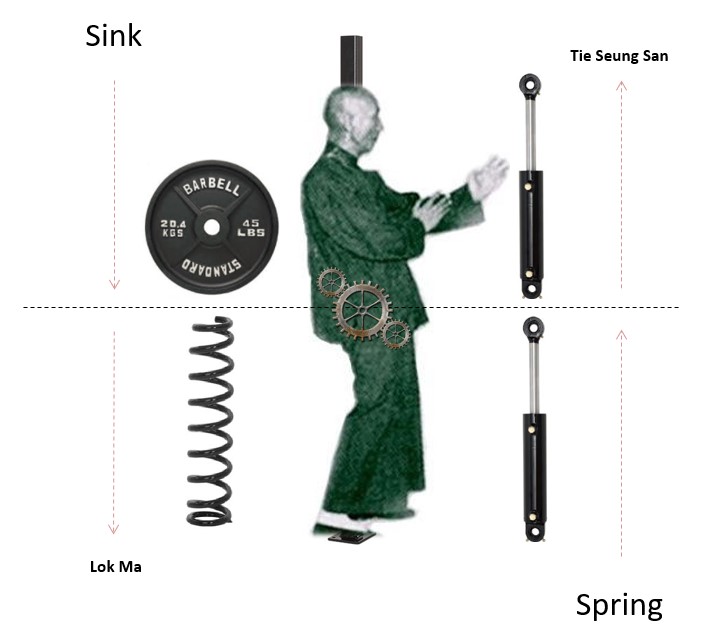
So, having introduced a couple of key concepts we can now begin to explore the structural elements, keeping in mind the necessary part these must play in the bigger system. As such, before we get into the detail of the individual positions, it is first important to introduce the two larger structural concepts of Tie Seung San and Lok Ma. These are visualised in the diagram below.
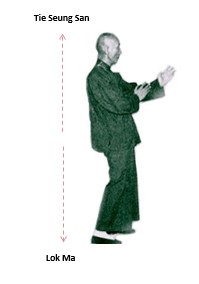
Initially this looks like the lower half of the body is sinking and the upper part of the body is rising, which is true – but only partially true. Actually, more is going on in both parts of the body – which can be visualised better in the diagram below.

In this diagram we see Grand Master Ip Man, with – on the left – a heavy weight representing the weight of gravity of his body pressing down into a spring, which correlates to the legs acting as shock-absorbers. We also see – on the right – two hydraulic pistons, one correlating to action within the legs, and the other correlating to the action within the body. We also see Yip Man is standing in front of a pole, and this pole extends through the middle of his body from the ground up through the top of his head – this is the vertical centreline. What is not shown here is the horizontal centreline, although we introduced the significance of this earlier. Here the focus at present is now starting to get to grips with that the body is doing in the Wing Chun basic stance from the feet up to the head (vertical) and all the major joints involved in this action.
Two of the key Wing Chun concepts are introduced here – ‘sinking’ and ‘springing’. Although this diagram may seem a little confusing as to what is going on, we can immediately see that now (as compared to the previous, simplified diagram) the upper body section has both a downward force and an upward force, whilst the lower body also has an upwards and downwards force. As to what the weight, springs and pistons are doing, we will now begin to investigate by looking at the lower body (Lok Ma) and upper body (Tie Seung San) structures, starting with the lower body.
Lok Ma. Lowering horse.
This concepts of ‘sinking’ and ‘rooting’ the stance are often used in Wing Chun, and until you can feel these for yourself it is actually very hard for the developing Wing Chun student to comprehend what is actually going on in the stance and the structure to make this happen. A key part of this is Lok Ma, which effectively means moving from a normal standing position, in which you would be stood at your full height with your legs fully extended, to a position where your legs are bent – which, for all intents and purposes, looks like you are sat on a high bar-stool and someone has photo-shopped the bar stool out of the picture.
One of the key reasons for doing this is to lower your center of gravity, and this is a concept that you should become very familiar with as you develop your structure and then advance further and begin moving this centre of gravity around, and attacking this in a moving opponent. A second reason is that standing with straight legs gives very little structural foundation – it is very easy for press onto someone’s chest and topple them over.
Now actually just bending our legs, as if going to sit down or to throw a ball, involves two forces that are critical to understand when using our legs in a new way within the Wing Chun stance, and both of which will be explored in much more detail in the later articles with practical exercises to feel how these work. The first important change is in beginning to take incoming vertical force (someone pressing into the chest, or the weight of gravity) downwards into the legs, rather than trying to resist this horizontally. The second important change is to begin to use the hamstrings and quadricep muscle groups (front and back of legs) as suspension – being able to absorb the weight of the body and incoming force to contract, so that this can then recoil and return this force back up through the body when this is released, which is part of Lut Sau Jic Ching – the forward springing force.

The important thing here is that in the normal standing position these muscle groups are actually used for stabilisation purposes as well as weight bearing. This means that when someone applies pressure into the chest when in a fully standing position that these muscles will try and counteract this force. With the legs bent, and importantly the pelvis repositioned, the hamstrings and quadriceps are no longer involved in the action of stabilisation – this role is passed to the adductor muscles.
The advanced student understands that they use their leg muscles in a different way to how they do when they stand normally, and how they tried to initially when they began working on the basic stance at the beginning of their Wing Chun journey. Again, this transition between the ‘before’ and ‘after’ position is where the magic happens, and this is something that needs more analysis and explanation in the following articles. Again, practical exercises will be provided that will help you feel this within your own body and help you create relaxed structure in this area.
Tie Seung San – uplifting upper body.
The concept of Tie Seung San is comprised from a number of the individual structural elements – specifically, Dung Tao, Ting Bok, Ting Yiu and Tei Gong. This is visualised in the diagram below.

Having mastered these individual elements, the Wing Chun practitioner has a definite sensation that their upper-body, from the tail-bone to the top of their head is projecting upwards. Also, they have the feeling that this is working together as a single unit, rather than individual parts..
Initially this can feel like the held is hanging from a string like a puppet, although the key thing to understand here is that this is managed internally through the body. This is why it is visualised in the diagram above as a hydraulic pump, which can be imagined to be working to straighten upper body from within the body.
Indeed, it is not just a case of visualising – it works from within the body because actually the muscles involved in the process are the core muscles within the body lifting up the chest, straightening the shoulders and neck i.e. from quite a poor postural ‘slouchy’ position to more of an ‘military’ position.
In the before and after diagrams above we see that the differences are actually quite subtle, but there is a noticeable difference in the individual areas and this has a difference on the posture, which actually makes a huge difference to the structure of the body.
In straightening the spine and neck we can see the transition of the shoulder joint that was in front of the central axis point marked by the horizontal and vertical arrows has now moved to be placed in the dead centre of this. Although this may seem to be a small change, this makes a huge difference in allowing the arms to hang independently of the torso, allow the use of gravity into the ‘heavy elbow’ and allow the arm to move through the ‘power lines’ correctly.
These points will only be understood once we begin to look at practical exercises and how to use gravity within relaxed structure. The critical thing here is to at least see the subtle difference, understand how this is structural achieved through repositioning the six major joints and recognising that this must be done to allow relaxed structure.
(1) Opening the stance
So, having introduced the wider structural concepts of triangulation and sinking / springing, we can now begin to break this down into the individual components.
Now, so far, we have maintained in a number of areas in this article already that we must flip our beginner approach to structure on its head and ensure that we work from the ground up, and Lik Chong Gerk Jang Sang – power originates from the heals. However, we have also added a caveat saying that, although this is indeed true, this does not mean that when we open the stance that we start with the ankles, then the knees, then the pelvis. Instead, the whole of the lower-body structure is shaped first by the action of the central area connecting the upper and lower triangular pyramid structures – namely, the tilting of the pelvis and straightening of the lower part of the spine (the lumber region).
Tei Gong – To make solid.
Although often referred to as the rotation of the pelvis, it is better to understand this as the tilting on the pelvis. Often, the beginner student will force the pelvis forwards and up from the gluteus muscles (bottom) but this just results in the upper body tipping backwards – resulting in the unbalancing of the whole structure. This is shown in the diagram below.

Here we see the shoulders have now tipped back to be placed behind the ankles. We also see that the straight back and neck have been compromised and are tilted backwards. We also see that the angle of the arms now angles upwards, resulting in pushing upwards to the opponent rather than extending out from the check along the horizontal centreline into the center of the opponent.

Through the internal lifting of the anus muscle instead, the tilting of the pelvis can be achieved to engage the hips whilst maintaining the straight vertical ‘pole’.
Again, this sounds quite simple and it does not look like a big difference in the ‘before’ and ‘after’ pictures, but actually this is a big structural change in how we hold ourselves upright against gravity. Indeed, this is why this change is so important – because it immediately changes how we use our legs to stabilise our vertical structure and support our weight.
This is why the most important first action of Yee Chi Kim Yeung Ma is the tilting of the pelvis whilst sinking – it is the very first action of using gravity in our bodies. This is a step that many take for granted and quickly bypass in getting into the horse stance. The advanced student knows that it is not actually possible to get into the open horse stance with relaxed structure without correctly getting into this through the initial step. The initial step viewed externally without any advanced understanding is to see the Wing Chun practitioner bend their knees and sink down with their feet and knees together / parallel.
In terms of what is happening inside the body, we can see from the before and after diagrams above that the coccyx (tail bone) position is changed to point downwards. However, the action of sinking is actually made possible in the first place through the action of tilting the pelvis. What this feels like is actually very different and this is an area that will require considerable analysis and explanation in the later article as to ‘how’ this achieved. Again, some simple practical exercises that are provided later will help you feel the correct position, and how quickly to spot where this is not correct.
The key thing to note here is that the action of repositioning the pelvis changes the dynamic of how the weight of the upper body is supported in the legs (the lower body). In addition, we also see that this straightens the lumber area (bottom part) of the spine.
This is seen in the modification made to the earlier image, below.
Not only does this action of tilting the pelvis create the structure in the lower body, but it is also critical in uniting the lower triangle (legs) with the upper triangle (body). This is visualised through the pelvis being like the central gear that sits on the central line that dissects the upper and lower part of the body. This pelvic gear then gears in the lower spine but also gears in the legs. This is why this activity is referred to as ‘making solid’ – it means that certain structural elements are aligned together.
Having ‘made solid’ the centre of gravity, the pelvis then becomes a stable platform grounded through the stability of the legs from which the upper body structure can then be constructed upon. This is why the hydraulic press is position on top of this line – effectively this sits as the base of the spine that is extended upwards in the centre of the body by the core muscles, bringing back the shoulders, hollowing the check, straightening the neck and allowing the arms to hang isolated from the main torso.
Bear in mind that what can actually happen here is that it takes a while to isolate the correct muscles and allow the relaxed structure to support the weight of the upper body. It can take a while to get to this position, during which the upper thigh muscles and knee muscles can be incorrectly used. This has the effect of locking the upper legs to the pelvis and the weight of the body is supported on the inside of the knee ligaments, which can be painful and cause damage. It also means that the developing student feels like a robot that has rusted up and can hardly move – far from the relaxed structure that they see in their Sifu who as able to move around with ease and power. Like every other element we are breaking down and re-working, this will take time to work through and takes trust.
Ting Yui – to straighten the back.

In the diagram below, we see the lower curve of the spine is straightened out. Flattening the lumber area of the spine is achieved by stacking the vertebrae, which happens in the same action as Tei Going (the tilting of the pelvis).
This is why this individual component is included here at the very outset. There are some great easy exercises for checking the before and after positions which actually helps with the correct positioning of the pelvis and finding the correct muscles to do this – although this is covered in the later articles.
(2) Components of the Vertical Center-line

So, having explained that the tilting of the pelvis causes our body to have to work in a completely different way to handle the downward force of gravity, we can now begin to explore what this looks like in the components of the vertical centre-line. As a reminder, the individual components involved in the vertical stack, or pole are listed in the diagram below.
The key thing to note from this is the revised placement of all the key joints along this vertical centre-line, except for the knees of course.
We have seen above the importance of the lower triangular pyramid in terms of the structure of the basic Wing Chun stance. Although in the diagram above, we see just the single reference to Kim Sut. This is because there is no Cantonese terms that I am aware of that captures the activity of the ankles, which we have identified as one of the key 6 major joints.

Lok Ma, however, as concept brings together the use of the pelvis, the knees and the ankles. Indeed, when setting up the structure by tilting the pelvis, the structure of Lok Ma must be called upon to hold the weight of gravity in the new way – the ‘after’ position.When the pelvis is in the normal standing position the weight of the body is distributed evenly down the front and back of the legs, being supported by the Hamstrings and Quadriceps. Any sideways motion is stabilised using the Adductor and Abductor muscles. When the pelvis is tilted, this transfers all of the weight into the back of the legs, into the Quadriceps. The action of tilting the pelvis and the transfer to the back of the legs does nothing if you hold tension in your legs. However, if you allow the weight of gravity in your upper body to come down into the legs, as if you were sitting down on a bar stool then you immediately begin to feel the ‘sinking’ sensation. In order to counter-balance this weight coming down (relaxation) into the legs there must be an upwards force from the ground (the structure). This is visualised below.

As such, we begin to see that the concepts of ‘sinking’ and ‘springing’ are made possible through the same thing – the use of gravity and relaxed structure.
The same feeling is in the legs when the stance is opened out into the basic stance shown above with the legs forming the shape of the lower-body triangular pyramid i.e. when the feet are a shoulder-width apart, and the feet are turned in at 45 degrees. Importantly, just as we said earlier that the knees are not held in as a separate motion, it is also important that the feet are not used in isolation either – instead the whole structure of the leg is rotated in unison – with the ankle, knee and the top of the pelvis moving together as one.
When the whole leg is rotated through the ‘opening’ (legs are opened so the feet and knees point outwards) and then ‘closing’ (the legs are rotated again so that the feet and knees point inwards at 45%) of the stance the suspension action of the body remains in the Hamstrings and the Quadriceps (which become the springs) and the Adductor muscles become the hydraulic piston that stabilises the vertical force of the weight of gravity and allows the whole structure to rise and fall up the vertical Centreline ‘pole’.
This takes a lot of time to adjust to using new muscles in the legs. Indeed, any developing Wing Chun student knows when they start to use their Adductor muscles that there is a lot of shaking and aching of the muscles as these are developed over time. Initially, finding these muscles the student may only be able to stand in the stance for a few minutes before having to stop. After weeks and months of adjustment and practice this can be extended to 30 minutes, a hour and beyond.
Until this relaxed structured can be achieved, other muscles will try and stabilise the structure. As such, it is again important to have a light-bulb moment – where you feel what is required and have a concept in the mind of what you are looking to move to. Then over time you will have to consciously work out the incorrect muscle tension, built up the strength of the correct muscles, and generally allow the whole structure to find itself in this new position, stripping out tension bit by bit. Eventually, you will be able to tilt the pelvis, sinking the weight of the body into the suspension springs and gear in the hydraulic piston to absorb and release force with as little conscious effort as getting up and walking across the room to get a drink.
The later articles we give a lot more investigation and explanation into this critical area. They will also provide some simple practical exercises that can help transition to this new ‘after’ way of using the legs.
Kim Sut – Knees in.
In Cantonese this description can be interpreted in an activity within the knees, rather than in a visual description of how the stance appears. This can have the effect of pulling the knees in using the Quadricep muscles, which is the very act of locking the knee joint and restricting its movement that we spoke of earlier. The primary purpose of keeping the knees in here is simply to make sure that they are aligned along the correct structural lines, so that the weight of gravity does not cause the rest of the structure above to cause it to wobble and call upon other muscles to stabilise it – as we spoke of earlier in the example of building a tower from stones.
In the diagrams below, we see the position of the legs and knees forming the lower triangular pyramid structure we introduced earlier.
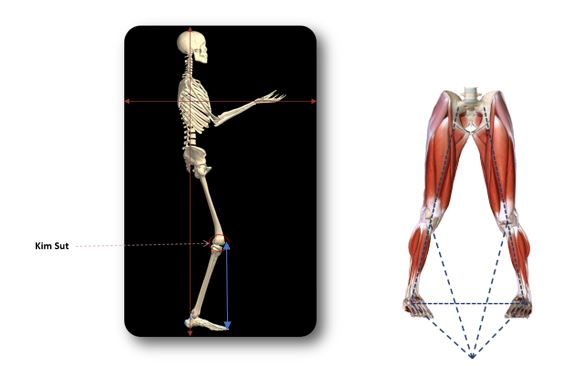
The important visual guide that you can initially work with to check if you are in the right sort of position (before being able to transition to this position through a continuous flow from the standing position) is that your knees should sink down to be in line with the tips of your toes – shown in the above diagram by the blue arrow. The second visual guide is that your knee remains in line with the line that extends from the centre of your foot, up through your leg to the pelvis area – as shown above, in the diagram on the right.
You should feel that the knee is not being pulled in, nor pushed out, but with the rotation of the whole leg that the knee is able to freely move in the suspension ‘bounce’ action of the lower body.
Ting Bok – internal expansion of the back and chest
So, having created a solid Lok ma foundation through the tilting of the pelvis and the transition of the body weight into the new structure of the legs we should also find that the lower part of the spine (Ting Yui) is straightened. All of this structure gives us the solid foundation of the tower – a number of well-balanced stones from which the remainder of our stone tower can be constructed.
Here we are looking to recreate the hydraulic press we saw in the earlier diagram, again pictured below – specifically, the upwards structure given from the hydraulic piston on the upper left of the diagram to provide counter-balance to the weight of gravity from upper body pressing down.

This may sound familiar – as it is just the same kind of relaxation into structure approach that we discussed in the lower body in the transition to Lok Ma.

So, let us have a look at the ‘before’ and ‘after’ pictures to begin to see what sort of difference we are dealing with.
Initially, as with the other positional differences, this does not look like much to the untrained eye. Yet, to an experienced eye there are some significant small positional changes that equate to major changes in how your Wing Chun structure is constructed.
What we can see in this ‘after’ diagram is that Lok Ma has been establish, the pelvis has been tilted and the lumber area of the spine has been stacked vertically. This has allowed the upper body to be opened and supported from within by the core muscles to bring the rib-cage back slightly which brings the chest upwards and the shoulders back onto the vertical centreline.
Remember, what we are seeking to do here is to hold the back to isolate the shoulders and form the upper triangular pyramid structure that (1) connects back into the pelvis and lower body to tie the vertical structure together and (2) to create the upper triangular pyramid that allows incoming horizontal force to be directed down into the ground / force to be delivered from the ground into the opponent.
Importantly, when the chest is not open (some say ‘hollow’) from inside it hunches forwards and takes the shoulders with it. Furthermore, not only does it take the shoulders within it, but it also takes the structure of the extended arm with it also. Specifically, by this I mean that the weight of the arm is immediately hung from the shoulder muscles (Deltoids) – and this is where in Chi Sau or when doing your Bong Sau’s that you very quickly burn out the shoulders and get shoulder pain (and potential damage).
In short, without this seemingly small but critical step the horizontal structure cannot be correctly found, nor can whole body structure be used to link together the horizontal and vertical structures.
A critical part of the shoulders being correctly aligned is to ensure that the triangular pyramid structure is correctly created. In the example below on the left we see the correct position.

Here the back is opened up (Ting Bok) from inside and the shoulders are relaxed on the horizontal line. This means that the Scapula (should blade) and Clavicle (collar bone) can be in the correct position. In doing so, the perfect triangle structure is formed from above as we see.
It is important to note, as mentioned earlier, that the wrist is never positioned exactly on the apex, but rather remains on its Chung Sing Seen ‘train tracks’ which create a 2 inch gap.
On the above picture to the right we see two examples of where this can go wrong. When the back is opened out too much, inflating the check artificially it pulls the shoulders back and the right arm action can be seen – namely the ‘wedge’ structure is opened out to much as the elbows extend outwards passing the line of the triangle – which is the structural power-line. When this happens, any incoming force will not pass down this line and will cause leakage of force which will then require stabilisation through the shoulder muscles (Deltoids) adding tension and unnecessary muscle use back into the system.
We can also see the opposite action in the same picture on the right, but within the left arm. Here we see what this would look like when check is not opened enough and the shoulder droops in front of the vertical centreline. Here we see the arm sinks in towards the body on the inside of the triangular power-line. When this arm faces incoming force from an opponent, it is easily pinned back into the body or it collapses backwards. To stop this action again unnecessary muscle use must happen, which involves tightening up the hand, wrist, forearm and the shoulder muscles to try and fix it into position and resist the force.
Lok Bok – Dropping shoulder.
The activity of Lok Bok involves two elements – the (1) isolated and (2) relaxed shoulder. We have seen that the activity of Ting Bok is critical for allowing the shoulder to be isolated from the main torso. When this is achieved the arm feels light and independent from the rest of the torso.
Here we again see the diagram showing the importance of having the shoulder on the vertical centre-line.

What is not so easily seen here is the relaxation of the shoulder which opens out from the weight of gravity – the relaxed weight of the arm now pulls down at the side of the body. It is a bit like having your two children hanging off each of your arms! But the important thing here is that this is natural weight and no muscles are used in the shoulder to hold this weight up. It feels like the arms are suspended by strings that are now being extended and pulling slightly from the head, neck and along the line of the Clavicle (collar bone).
This action requires the beginning student to first stop using the Levator Scapulae muscle – the one that you use to shrug your shoulders. This is highlighted in the diagram below on the left.

It also requires that you stop locking the shoulder and back together using the large, external Trapezius muscle – shown in the picture above on the right. This muscle is also used in the action of elevating, retracting and depressing the shoulder. So, when you pull the shoulder back from this muscle you look everything up, which is why Ting Bok must open the chest from the inner core muscles, rather than these larger external muscles.
When your Sifu keeps telling you to relax your shoulders, it will be one or both of these muscles. And, it is this muscle that brings the Bong Sau arm up into the shoulder and loses the correct structural position causing your shoulder muscles to then get involved and burn out.
It makes sense when you see the muscles and understand their upwards action that this activity is going to have to be isolated and relaxed to allow the shoulders to sink under the natural weight of gravity into the new structure.
Lok Bok is one of those key joints which the Wing Chun practitioner must actively keep in mind as they set up their stance. You should actively find the structure and allow the feeling of the weight of gravity to hang down. This kind of feels like your skin now weights 10 times as much as it is sagging down your skeleton under the weight of gravity.
Dung Tao – upwards lifting head.

The Straightening of the neck and head at the top of the spine is an activity that feels quite strange when first being developed by the Wing Chun student. Again, from the pictures below, we see that this is only a subtle change from the ‘before’ and ‘after’ pictures.
The key reason for this action is to align the weight of gravity into the vertical centre-line of the body – remember, a key principle of Wing Chun is to disrupt your opponent’s structure, but always to maintain your own. The head is at the top of the vertical structure and it weighs a lot – which anyone who has had a stiff shoulder can attest to. It also has a huge impact on the centre of gravity within the body. Moving it from the vertical centre-line inadvertently results in unbalancing your own structure.
This is one of those areas that can be particularly difficult for developing Wing Chun students to be strict in keeping correct, because they have not yet fully developed all the structure that sits below this, and will therefore look down at lot and their feet, knees, legs, arms etc. as they try and place their limbs into the correct structure positions. Eventually they will be able to find these positions naturally and can then avoid this action which greatly unbalances them.
It is also necessary to have developed the structure in the lower back and upper back, as we have discussed, so that – just as the back had a solid platform from Tei Gong, so the head finds a solid position from Ting Yui and Ting Bok – now allowing the final straightening of the spinal cord.
The placement of the head also impacts the relaxation in the upper back and shoulders. If the head is tipped forwards, then it needs the Trapezius muscle to provide additional stabilising support, for example. This in turn then undoes all the good work achieved through Ting Bok and Lok Bok. Again, the principle here is of allowing the structure of the skeleton to best support the weight of gravity without having to engage additional muscles to stabilise the stone tower where imbalances allow force to leak-out at the sides.
This adds the final piece of the vertical jigsaw, which when correctly held, makes you feel like you have had a pole inserted up through the bottom of your body, through your spine, up through your neck and out through the top of your head.
The Sum of the Parts – Vertical Centre-line
When you have been able to break apart your ‘before’ structure into each component part, work through each element and bring this back into the ‘after’ vertical centreline position it has feeling of you have put on a very heavy metal coat. You feel that your legs are having to support this additional weight down into the legs. You also feel that your skeletal structure and muscles are having to hold a solid upper body shape or else the weight of the coat would cause you to slouch and crumple over. This is the weight of the external muscles having now relaxed and being pulled down under the weight of gravity over the internal skeletal structure held by the core muscles.
Each and every Sifu will have their own way of describing this feeling, and their own visualisations for helping them understand and construct this in their own minds. You will have to build up the individual components, each of which will have a feeling which you will need to describe in words, to explain to others (your Sifu especially) how these feel, whilst also using some visualisation within your mind to understand how your body is now working in this new relaxed, structural way. In the articles that follow I will share the visualisations I have used, and others that were shared with me by my Sifu and a number of students. These visualisations are like the guiding principles that make larger sense of the individual techniques – they create an image in the mind (the nearest thing to an x-ray) of what is going on inside your body, which you can then seek to reconstruct.
(3) Components of the Horizontal Centre-line
The vertical line structural components comprise the shoulder, the elbow and the wrist. This is shown in the diagram below.
The vertical centreline extends out from the centre of your chest, and along this the wrists are located in the different hand positions from the Sil Lim Tao form.
It is important to note that this vertical centreline changes as soon as an opponent is involved; specifically, the vertical centreline then connects the vertical centreline of you and your opponent. It is also important to point out here that this centreline is based on the centre of gravity, and not the actual fixed position of the centre of the chest, because once you start to move the body using shifting and stepping this position changes dynamically.

Although we have visualised the shoulder, elbow and wrist in a triangular pyramid, when we look at what is going on in the physiology of the muscles, tendons and bones of the skeleton things get a little more complex. The diagram above shows some of the complexity involves in what seems like a simple action of reaching out, extending the arm – here is the action of the Taan Sau.
In this diagram we see three hydraulic pistons – one in the forearm (the Extensor muscles), the back of the upper arm (the Triceps) and a couple of muscles that are within the lower / mid back itself (the Teres major and Latissimus Dorsi muscles). Each of these has a different function which will be explored in more detail as we progress through the analysis of the major joints in the vertical centreline. The key thing shown in the diagram is that all these pistons work together to extend out the Tann Sau, as happens in the Sil Lim Tao form. This combined action is responsible for Fong Song – the relaxed extending arm.
It is important to note that the the Pectorialis Major (Clavicular Head) works with the Latissimus Dorsi in creating the flexion (rotating the arm at the shoulder to lift the arm in front of the body) of the Humerous (upper arm bone). This works with the Teres Major which is responsible for rotating the Humerous inwards to create the triangular structure.
We also see a spring is added in the diagram, which is used to express the suspension type effect that these different muscles working together with the relaxed structure creates. Here the advanced Wing Chun student feels that any incoming force into this relaxed structure is supported by the waist, and this is reflected in the diagram through this spring. The combined structure of these three pistons and this suspension gives rise to Tseung Kiu Ma – the elbow position maintained at around a fist distance from the body.
Finally, we see that these pistons represent the action of the different muscles involved in this process. What is noticeably absent is any muscles around the shoulder itself – instead, these are in the back, the upper arm and the forearm. The ‘before’ and ‘after’ diagram below shows how the arm is held (incorrectly) from the shoulder on the left, and (correctly) with the shoulder relaxed on the right.

Without the orange lines to show the difference, it might be difficult for the untrained eye to notice much of a difference. Your Sifu will notice this, for sure – as to the trained eye this is very noticeable.
The key visual differences here are the elbow is slightly lower in the relaxed structure, as the weight of the arm is sinking down. This also brings the hand slightly back and increases the angle between the upper arm and the forearm. Where the arm is held out from the shoulder the forearm extensor muscles also get involved in holding the position, and this extends the arm forwards a little more, decreasing the angle between the upper arm and the forearm. Although it cannot be seen from here, using the shoulder muscles slightly raises the shoulder, through the raising of the clavicle (collar bone) – this is why the whole shoulder is raised. This can also impact the Scapula, which in turn rotates the elbow slightly outwards from the body and off the power-line.
The key thing to understand from these diagrams is that the arm cannot simply be placed, at least not without it engaging tension in the shoulder muscles. Instead, the arms must be projected out to their final position from the Chamber position. Then, and only then, will the correct muscles provide counter-balance to the weight of the arm. This leads us nicely to now examine projecting the arms forwards and then sinking the elbow.
Mai Jang
Mai Jang relates to the ‘forwarding’ of the elbows inward and forward. As we have covered earlier, the physical positioning of elbows at any given ‘fixed’ position in time is determined by the shape formed by the triangular pyramid of the upper body. We have also made clear that the elbows do not actually pull inwards, as this action would require the use of additional muscles that would deviate the elbow from its straight path. The elbow travels forwards, and as a result of the triangular pyramid structure, the position of the wrists on the vertical centre-line mean that the arms travel inwards into the apex of the wedge structure that is formed.
It is important to remember that the elbow travels upwards along the power-line of the base of the triangular pyramid structure (as shown in the diagram above, on the left), not sagging below this, or rising above this line. It is equally important that the elbow remains on the power-line of the base of the triangular pyramid structure (as shown in the diagram above, on the right), not veering inwards or outwards from the line. As such, when bringing the arms forward and inwards you should have this 3-dimensional structure in your mind and actively be thinking about the elbow travelling along this line in a constant fluid motion, from the start position, through to the end position.
There are a couple of critical factors which make the arm(s) being able to travel outwards and inwards possible. The first of these is making sure the structural elements (the supporting stones) behind the arms have found the correct, relaxed structural positions. It also means that the elbows are hanging under the weight of gravity from the relaxed and isolated shoulder. The action of the muscles in the arm must be correct, supporting the weight of the arm correctly and not ‘hanging’ from the shoulder. A final key factor is the position of the wrists as they travel along the vertical centre-line.
In addition to the location of the elbows, the positioning of the hands also plays a critical role. In the discussion of the centre-line earlier we covered that the hands extend forwards, but at a slight distance from the physical centre of the body.

The hands always extend along these separate tracks outwards from the body. On the diagram above and left we see that the hands extend and return along this line. In the later articles we will look at the various positions the hand takes along this, and also how the hand continues on this line despite the elbow leaving the base of the triangular pyramid during the action of Bong Sau.
The key thing to understand here is the for the developing student the ‘before’ looks like placing the elbows and hands in these positions to artificially recreate the technical positions. For the advanced student who has mastered structural relaxation, these are the natural positions that the arms form as they flow outwards and back into the body.
Jang Die Lik – elbow under strength
Jang Die Lik is often associated with ‘elbow power’, which is one of the many seeming secret powers of Wing Chun that transfix, yet evade the developing student. There are no secret powers in Wing Chun, just ways of utilising the body that do actually seem to offer super-human strength. There is no magic to these, just understanding how to reprogram the body and use it in a more efficient and effective way.
The physiology behind this structural position and movement concerns itself with both stabilising and sinking the elbow. We discussed the significance of the shoulder in that it plays an intersecting role between the horizontal and vertical centre-lines, in a similar way that the pelvis plays in uniting the lower and upper body structure. We have seen that the shoulder is intimately connected with the back structure, but also intimately involved in the movement of the arms. The isolation of the shoulder means that the muscles of the lower back can be used freely to pivot the upper arm (Humerus bone) – as shown marked by ‘A’ in the diagram below.
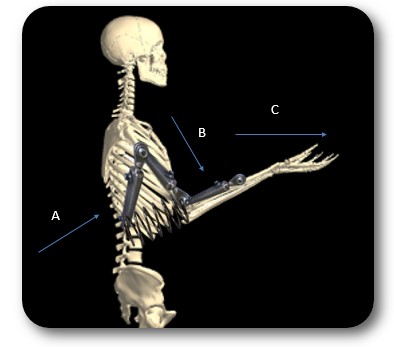
Here we seen the actual muscles involved in this process – the Latissimus Dorsi and the Teres Major.
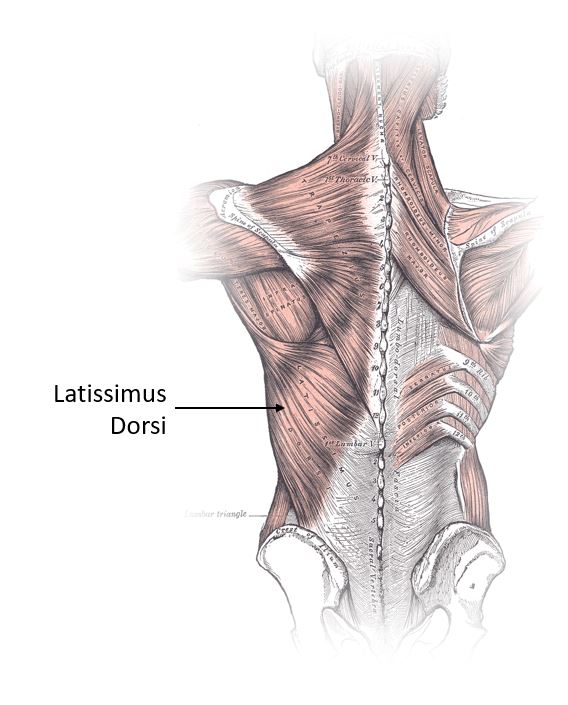
The Teres Major being responsible for internal adduction, bringing in the upper arm as it is extended forward by the Latissimus Dorsi and Pectorialis Major (Clavicular Head).
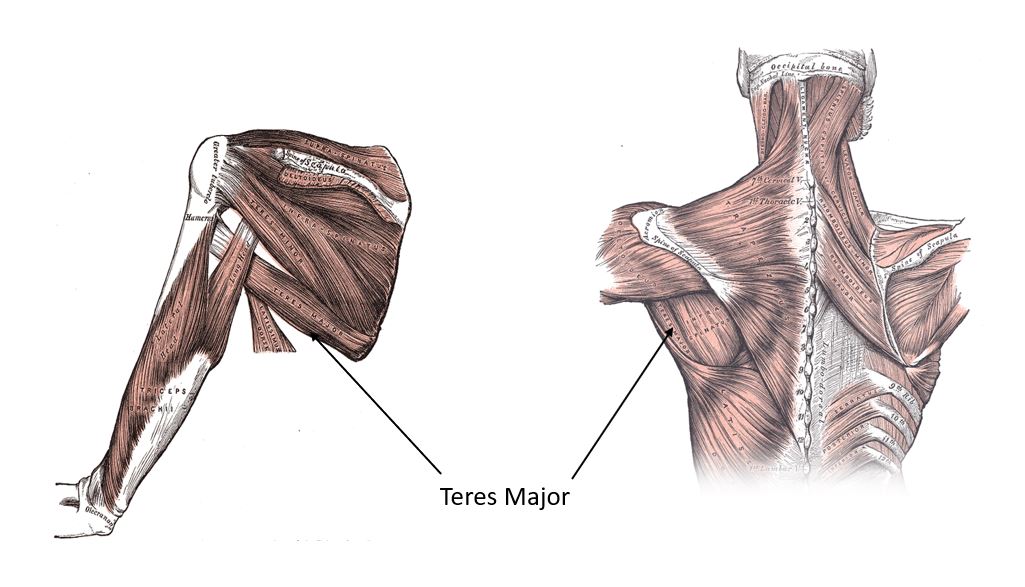
The Teres Major rotates the upper arm, bringing the arm in so that rather than extending out directly with the hand in line with the shoulder, it brings the arm up and inwards so that the hand is instead in line with the with side of the face when viewed from the front.
It is these muscles, when properly used through relaxed structure, that give the feeling of a power coming from underneath the elbow. Which is not actually far from reality, because a lot of the muscle is actually lower than the elbow, despite the connection to the upper arm being higher than the elbow to allow the pendulum action of the upper arm and elbow to happen.
A key part of allowing this action to function is the importance of the isolation of the shoulder and allowing the weight of gravity to hang the relaxed arm from the sides of the body. When this is done, the Bicep muscle (the muscle on the upper front of the arm) can be engaged to elevate the forearm upwards to the correct angle. The important thing here when doing this is to keep the natural weight pressing down into the elbow. At this point the weight of the forearm is then loaded into the elbow (through the combined use of all three of these muscles), providing the ‘biting point’ in the arm necessary to allow this to provide the ‘spring’ involved in the release of forwarding.

Here we see the forwarding action created by the three ‘piston’ muscles counter-balancing the weight of the arm now coming back down the angle of the forearm into the elbow.
The important thing to understand here is that this action is made up of three muscles and not just the Tricep, which is often attributed this action entirely in other Wing Chun publications. A fuller explanation of how these muscles work together is covered in the section below on Fong Song, as this is an essential aspect of extending the relaxed arm.
The importance of the ‘under elbow strength’ is both is delivering force from the ground into your opponent and also being able to receive this back from the opponent through the structure of the body into the ground. We looked earlier at the importance of how this needs to be redirected down into the stance to avoid this going back along the horizontal centre-line, into the shoulder and topping you backwards.
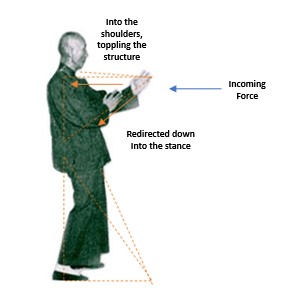
Now we have looked further into the physiology of the structure we start to see how this is made possible. Jang Die Lik allows the weight of gravity and any additional incoming force from the opponent into the arms to be absorbed in the ‘spring’ we visualised earlier behind the elbow. This also allows the force to be taken down into the legs and the ‘suspension’ and hydraulic pistons.
The feeling can especially be felt when driving an opponent away along the power-line. You can feel the elbow is supported by the body, allowing you to engage the three arm pistons more and more, feeling this supported from a solid base on the ground, through the legs – rather than having no base and finding that you end up pushing yourself backwards, toppling your own stance.
Lok Bok – isolation of the shoulders.
Earlier we saw that the isolation of the shoulders allows these to hang down by the side of the body under the natural weight of gravity without having to engage any stabilising muscles. This involved actively stopping using muscles involved in the lifting the shoulder, in a shrugging type of motion. This isolated the shoulder from the neck and back. Now we need to look at how the shoulder needs to be isolated from the arm.
Within the arm, the isolated shoulder action allows the arms to move independently of the body – specially, without having to engage the Deltoids (shoulder muscles).
Isolation of the arms can confuse people and cause them to then try and do more with the arms. Isolation does not mean independence – indeed, quite the opposite; it is important to isolate the arms so that they can do less, working together with the rest of the body behind it to provide a greater share of the effort. Indeed, the beginner student often isolates the arms from the rest of the body because of the muscular loading only within the arms and shoulders. As such, isolation here, actually means removing incorrect stabilisation muscles so that the natural structure of the arm can be utilised.
As a general rule, the beginning student tries to do 90% of the attacking effort with the arms and shoulders, where they are tensed up using muscles. The advanced student seeks to use only around 5% of that same effort in the arms and shoulders. As such, although the skeletal ‘before’ and ‘after’ pictures do not show much difference, if we were to have these showing the different levels of muscle usage, then the sheer size of the variation would be seen.
When it comes to the vertical structure the isolation of the shoulder is critical, because otherwise the shoulder muscles are used in the punch. Here the Deltoid muscle ties the shoulder and the upper arm together through muscular use. This has a tendency of swinging the arm around and out in a hooking type motion. Also, when the weight of the arm is held from the shoulder, it is this muscle which has to be engaged for stability purposes. You can feel this muscle burn out very quickly when trying to do a Bong Sau when this muscle is used, when the shoulder has not been properly isolated.
When the Deltoid muscle is engaged, and the weight of the arm is hung from the shoulder, this has a tendency of then also loading tension into the forearm. This is because the lifting motion of the Deltoid pulls the elbow joint out of the alignment from the triangular pyramid, as shown below.
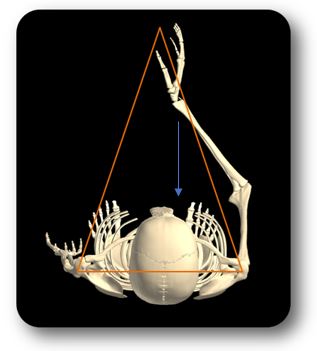
This then leaves the forearm and wrist in a weak position, which can then easily be pinned back into the body – as indicated by the blue arrow in the diagram above. To compensate for this force leaking through the structure, the forearm muscles then engage to try to stop the forearm collapsing back. The end result is that the whole arm is loaded with tension and does not have the necessary relaxed structure.
Actually, the Deltoid muscle is actually made up of three separate muscles, which are shown more clearly labelled in the diagram below.
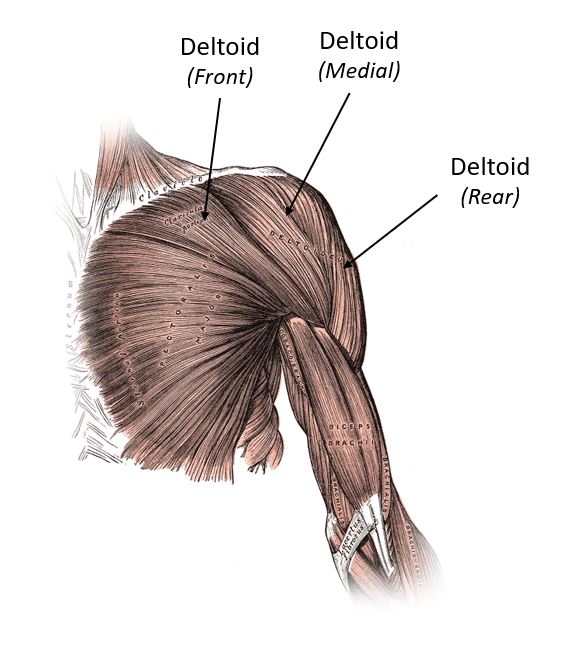
These are the muscles that need to be relaxed for Lok Bok. Indeed, the ‘dropping’ effect feels like these muscles are being pulled down over the shoulder and stretched by the weight of the arm hanging isolated at the side.
Now, these muscles are still engaged in the flowing relaxed arm movements once the dropping shoulder isolation has been achieved. The key difference is they are used only in the motion of the arm forwards and backwards, without any left to right action (i.e. raising the arm outwards from the body). The other key difference is these muscles are then used as part of the structure and are not used for stabilisation where force is leaking out from the power-line.
Fong song – Relaxed extending arm.
Rather than starting with Tseung Kiu Ma – (the elbow position maintained at a fist distance from the body), which often the beginning student will simply place into this position, it is better than we understand how this position is achieved through the correct motion of the arm as it transition from the Chamber position out into the extended positions (such as Tann Sau, for example).
The relaxed, extended arm is made possible from the isolation of the shoulder to allow the three pistons to work together. This also requires taking tension out of the hand and forearm. This is only possible when the muscular fight is taken out of the arms and the developing student is able to break through this training wall. To do this they must find for themselves that the ‘after’ structure gives them more power and stability that the ‘before’ position. This takes time, not only because the rest of the supporting structure (the base of the tower) must be found, but even having created Lok Ma, set the upper back, isolated the shoulders and united the upper and lower body structures, a new way of using the muscles in the arms then needs to be discovered and mastered.
We have seen that initially, a street punch is led from the hand, shoulder and also uses the lower back muscles. Being held from the shoulder that the arm non longer has the weight of gravity pressing down onto this giving it increased mass. Instead, we have to break this down by understanding the parts played in the new Wing Chun relaxed structure, so we can build this back up again as a single application of technique in motion.
As mentioned earlier, the arm is extended in a reaching outwards and forwards application using three muscles. As a reminder, these are the Tricep (B) Teres major and Latissimus Dorsi (A) along with the extensor in the forearm.

Each muscle has its own action, which on its own would not be helpful. Firstly, the Tricep muscle is used to extend the arm. Here we see the Tricep muscle located at the back of the upper arm.
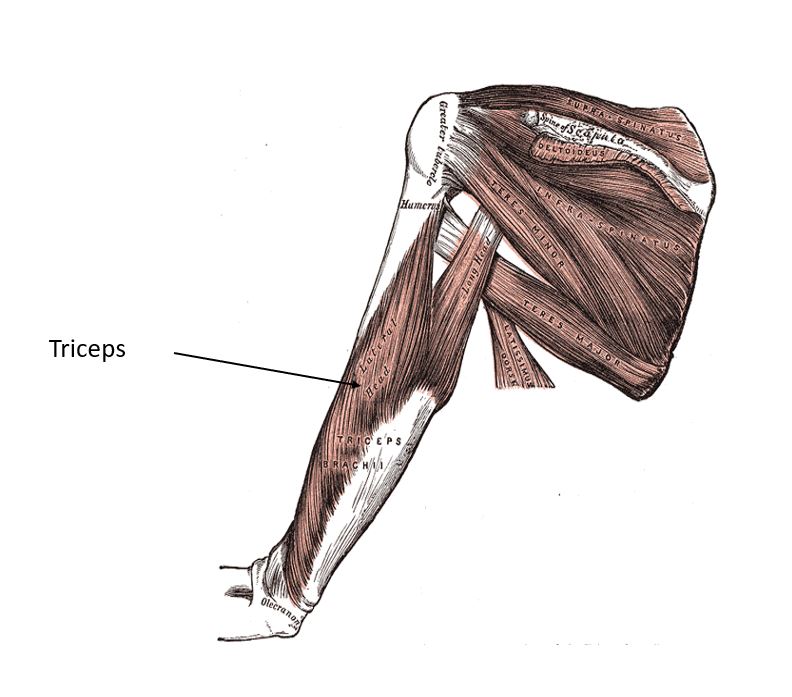
The action this has on the Tann Sau, in the diagram below is marked by the blue arrow.

The use of the Tricep muscle alone would straighten out the arm into the position below.
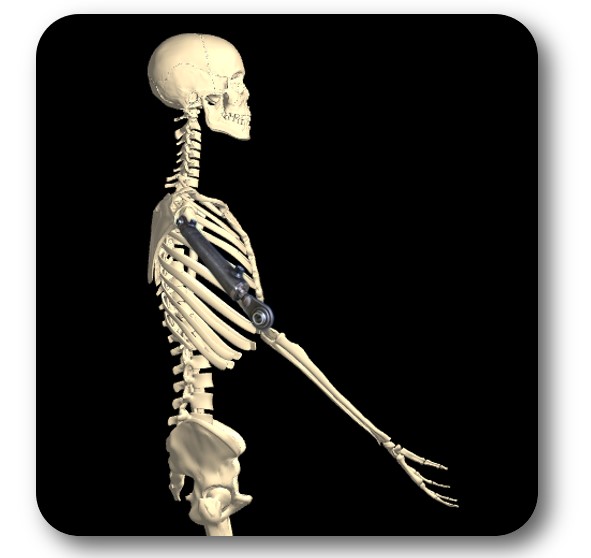
As such, the Tricep must also work with the Pectorialis Major (Clavicular head) and Brachioradialis, the Teres Major and Latissimus Dorsi in moving the elbow forwards the Bicep and Latissimus Dorsi (and the relaxed weight of the arm under the force of gravity) backward along the triangular structure.
So, now we have be able to move our elbow in and out towards the body and to change the angle between the upper arm and lower arm through the contraction action of the Biceps and the extension action of the Tricep.
Importantly, the Biceps and Triceps act against one another to bend and straighten the elbow joint. To bend the elbow (reducing the angle inside the elbow), the Biceps contracts and the Triceps relaxes. To straighten the elbow (increasing the angle inside the elbow), the Triceps contract and the Biceps relax. They are not able to both work at the same time. This means that during the action of the arm reaching out forwards, the Tricep is working to straighten the arm, combined with the Pectorialis Major (Clavicular Head) this would extend the arm out forward in front of you on a horizontal plane with the shoulder, elbow and wrist aligned at the end of this movement.
In Wing Chun this is referred to as ‘popping the elbow’ meaning the the ‘heavy’ or ‘sunken’ action of the elbow is lost breaking your the upper body triangulation – the tetrahedral structure created by the shoulder, elbow and waist). The correct action is to use the Brachioradialis muscle in the forearm. Like the Bicep, this is an extensor of the forearm. This muscle, however, is able to work in unison with the Tricep allowing a forward projection of the arm and maintenance of the wrist position out from the body through the tetrahedral structure to the centreline point.
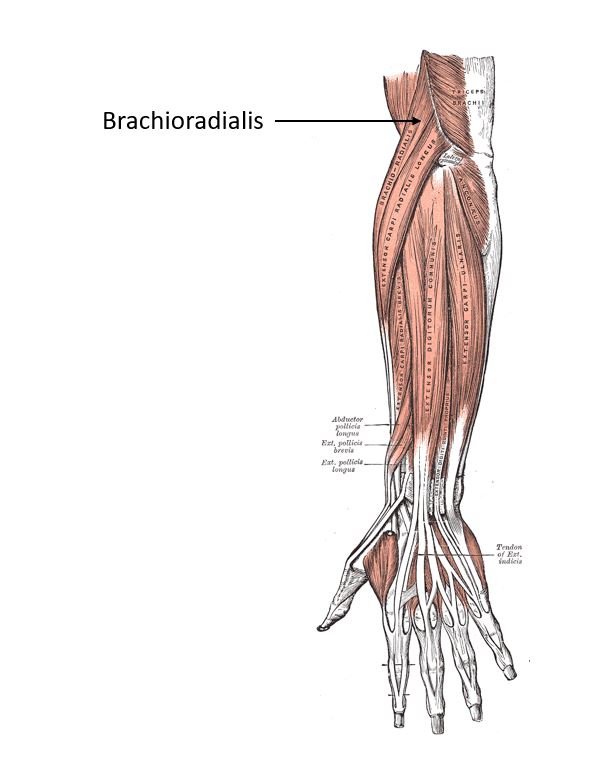
In the diagrams below we see the action of the Latissimus Dorsi and Pectoralis major (Clavicular head) working with no additional action in the Tricep and Brachioradialis to avoid the action in the central figure (lifting the arm so the forearm is point at a 45 degree angle upwards), and instead create the forwarding action illustrated in the right-hand figure (moving the elbow and wrist up and forward outwards from the body in unison).

We see in the middle picture above that the elbow is brought forward by the pendulum action of the Pectoralis Major (Clavicular head) and Latissimus Dorsi, but the angle of the forearm is maintained (i.e. no additional action is applied by the Brachioradialis) and therefore the direction of force follows the arm upwards. This is quite common in the developing student who are learning to isolate different muscles.
In translating the vertical relaxed structure to the horizontal structure it is therefore necessary to also use the forearm extensors combined with additional extension of the Tricep. This has the action of taking the elbow up along the bottom of the triangular pyramid and focus all the energy along the horizontal centreline into the opponent.
Importantly, the amount of muscle now used is greatly reduce – the forwarding of the elbows needs to be stripped right back when compared to the amount of force used in the beginning student who leads with tight fists and tense arms. These are big muscles and once isolated and mastered the amount of forwarding effort feels nothing more than being super relaxed at home reaching out to pick up a cup of tea from the table. Yet, because this is working along the power-line, this is capable of sending a training partner leaning into your Tann Sau structure flying across the room with seemingly no effort at all.
This is a continuous flow of energy, seeking forwards gently rather does not take much to stop it. However, like water behind a damn, the pressure builds up so that when this is released it springs the arm forward. At this point the elbow can be released with the same relaxation but at full speed – this is Fa Ging, explosive energy.
Importantly, the energy that builds up behind this is 5% in the arm, but 95% from the whole-body structure that is formed from all the other major body joints aligned behind it.
Tseung Kiu Ma – Elbow position maintained (fist distance from the body).
Tseung Kim Ma is not a technique or a fixed position. For the developing student the Sifu will often give the guidance of saying the elbow should be maintained a fist distance from the body. This allows the student to start to get an idea of where the elbow should be positioned relative to the body and get a feeling for this placement internally. However, placing the elbow in this position is not enough. The whole of the earlier structural foundation must first be set-up in order that the arm can hang under the weight of gravity from the isolated shoulder.
Where this is placed, the elbow hangs off the shoulder muscles and is noticeably higher. Here we see this in the ‘before’ and ‘after’ diagrams.
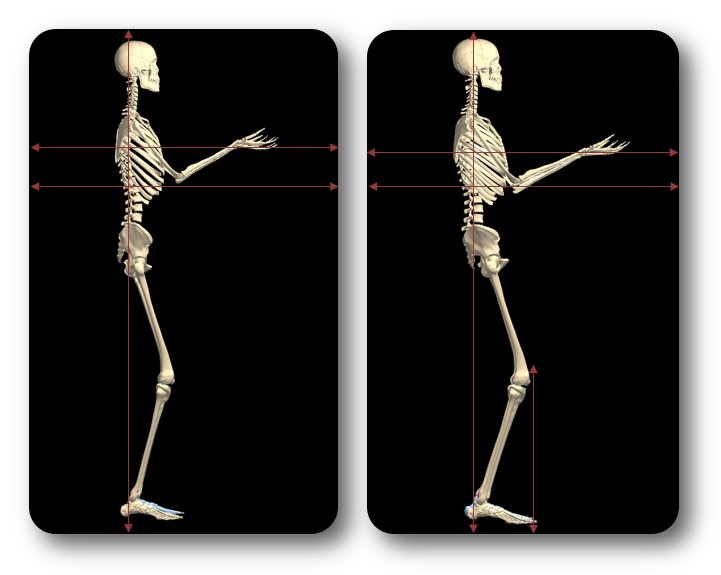
When the arm is allowed to hang with natural weight from the shoulder the elbow will hang down alongside the body on the Jic Seen centre-line. At this point the three piston muscles are not engaged. When they are engaged this brings the arm forwards into the Tseung Kiu Ma position. This is reflected in the gears shown in the diagram below.

In gently engaging each of the three pistons the arm flows through the relaxed structural motion into the position. It can only feel then like you elbow is supported with an invisible 4×4 block of wood. This is just the natural position the arm finds when the three pistons are engaged initially.
The downwards weight of the arm provides sufficient counter-force to keep them engaged (the ‘biting point’, which keeps the elbow ‘sunk’ in this position. Any additional use of the muscles is enough to send the arm forwards out of this position in a naturally weighted, relaxed reaching forwards way.
Finding these three pistons and being able to use them together under the weight of gravity takes time. However, once this is achieved you have mastered how to use correct, relaxed structure in the upper body.
The Sum of the Parts – Horizontal Centreline
In Wing Chun the use of incorrect muscles to stabilise leaks of energy from the power-line acts like applying a brake and slowing down the potential speed that the arm can be propelled forwards along the centre-line into the opponent. In the beginning students mind the justification (the Physics) for this is that more muscle equals more power. This is true to some extent, but completely the opposite of what we are looking to achieve in Wing Chun.
In his Third Law of Motion, Newton (1687) posited “whenever a body exerts on another body, the latter exerts a force of equal magnitude and opposite direction on the former”. What this means is that if you throw a punch into an opponent then the opponent should be knocked backwards with the same force. Now, as we have pointed out above, this does not take into account what happens when the opponent is bigger – and, what actually happens is the energy of the punch can come back into the punchers body, knocking themselves backwards. This is why you have to be able to deliver force from the body and be able to receive it back into it through the horizontal and back down to the ground i.e. the much larger, solid base of the legs supported by the floor.
However, the Physics still applies. Furthermore, In the Second Law of Motion, Newton posits “A force acting on a body gives it an acceleration which is in the direction of the force and has magnitude inversely proportional to the mass of the body’. The equation for this being expressed as Force = Mass x Acceleration. So, if you through a tennis ball (the mass being the weight of the ball) at 10mph (the acceleration) this will not deliver as much force as if you repeat the same exercise but speed up the delivery to 100mph. Further still, if you change the tennis ball for a cannon ball, this will do a lot more damage. However, if you use the cannon ball (a much heavier mass) but this is rolled slowly (hardly any acceleration) then actually the high-speed tennis ball will cause more damage. This is why to maximise the effectiveness of our strike in Wing Chun we must give equal consideration to both the weight and speed of the attack.
Again, initially the developing student is only thinking about delivering an attack from their fists, or arms, and this means they are only using a small percentage of the total available muscles in their body – and, these muscles are a lot smaller and less powerful than those of the legs. Here mass that the student is using is the weight of the fist projected through the air with the weight of the arm also following this. This might be the equivalent of 6kg of mass. However, when relaxed structure is used in the body then the whole-body weight can be used as the mass – increasing the mass projected into the attacker to 76kg for example. The result means that a smaller opponent can deliver a much more powerful attack, than the large opponent using a tense, muscular technique.
Anyone who had had children, or had a drunk partner sleep on them knows that the weight of an arm of leg you are trying to shift off your body is surprisingly heavy. This is because it is completely relaxed and has the full force of gravity pressing this down towards the ground…onto you. Equally so, if you hold your arm above a table and let it drop then likely the first time it will not make much of a bang, as you were using some muscles to stop this. However, if you repeat the exercise and completely let the arm relax as if you were asleep then the impact will make a much larger bang. This is the power of allowing the natural weight of the body to move under the power of gravity. This is what can be found by correctly using the relaxed structure of the six major joints.
The key to making this possible is initially the correct vertical structure which allows the shoulders to be isolated. When the shoulders are isolated then the arm is free to move along the power-line of the triangular pyramid without any interruption. Now, the horizontal structure comes into effect. The arm is not isolated, but is instead using the three piston muscles, which include the large lower back muscles, which mean that the muscles are big, then are not hampered by other unnecessary muscles and then can simply explode (the principle of Fa Ging) using muscular contraction through the full range of motion and using the full weight of the relaxed arm. The result is a punch that has increased mass and increased speed – you have now switched out a tennis ball at 10mph to a cannon ball at 100mph…which is going to do an incredible amount of damage.
(4) Components of Whole Body Structure
Having broken down the original ‘before’ structure of the convention standing position and way of punching, we have been able to build up the ‘after’ structure piece by piece. Having combined them all back together we see the final picture these jigsaw pieces make is gestalt – it is more than the sum of the individual parts. It is a very clever use of the human physiology to get the maximum efficiency and effectiveness out of the body – allowing someone smaller to be able to fight a larger opponent. This is achieved through using the whole-body – through the use of Lut Sau Jic Ching.
Lut Sau Jic Ching – Forward springing force.
Lut Sau Jic Chung is the concept of forwarding energy that is loaded into the body from the weight of gravity into the relaxed structure, and amplified by an incoming pressure from the opponent into the ‘suspension springs’ created in the body – both in the arms and the legs. This translates in meaning to ‘hand lost, spring forward’. This means that where the pathway along the vertical centreline (Tse M Seen) between you and your attacker is cleared, your attack will automatically fill this space and attack your opponent.
Many developing students do not understand the concept of forwarding, they think that this means to continually press the arms forward, but this has only the negative effect of losing the correct elbow position (Tseung Kiu Ma) and also the heavy elbow stability (Jang Die Lik) and relaxed structure in the arm (Fong Song). For example, when in Dan Chi Sau, they will continue to press forward the Tann Sau to counter-act a structurally better Fook Sau from their opponent, but in doing so they extend their arm forwards to the point of this being held by the shoulder, losing all relaxed structure and being held by muscles alone.
Instead, it is important to remember that the relaxed structure created from the correct use of the six major joints means that the arms travel along a given plane and reach only a given distance. In the first form, Sil Lim Tao, the relaxed forwarding of the arm (Fong Song) will bring the arm out to the correct elbow position (Tseung Kiu Ma), which again is roughly a fist distance from the body. If you extend out passed this position, then the structural power of the arm is compromised for that particular technique. In this way, it is possible to use the three arm pistons (Tricep, Teres major and Latissimus Dorsi) to extend the arm forward in the correct structural position and to gently continue this motion once the arm has reached its structural positional boundary.
The feeling is a bit like having the hand-brake on in the car and using clutch control to gently release the clutch a little and increase the accelerator – you get the feeling that the car has built up energy and once the hand-break is released the car springs forward a little. In this way, the arm continues to flow forwards in a relaxed manner, even though visually it seems to have stopped in the Tann Sau position, for example. The developing student only begins to understand this when they touch the forwarding arm and feel that this is still ‘seeking’ forwards and is not static. This is compared to the developing student who pushed their arm out to the end position and then stops.
Actually, the whole of the Sil Lim Tao form should be understood as a single flowing technique in the arm – not a series of individual positions. From the Chamber position the arm flows forward until it reaches the structural boundary created for that particular relaxed structural position. When the hand changes the direction, for example between Wu Sau and Fook Sau, the structural hand-brake is switched off and the continual forwarding force is released allowing the arm to continue. It is important to understand that this is achieved not in the hand itself, but through the rotation of the forearm (supination and pronation). Where this is held in the hand in the developing student it is associated by muscular tension in the hand and forearm. Understanding how the hand is turned in a relaxed manner is covered in the later articles.
The important thing here is that forwarding is possible only because the arm is acting like the ‘biting point’ of the clutch and accelerator in a car. The weight of gravity pulling the arm down means that the three pistons have some resistance to push forward against. Importantly, this also allows the sinews and tendons to gear this weight into them, which is important for the initial ‘spring’ effect, once the arm is released and able to flow forwards. When the weight of the arm is held from the shoulder then the elbow has not resistance coming back down into it and this ‘spring’ is simply not activated.
The same is true for the legs – when the pelvis is correctly tilted, and the weight of the upper body is allowed to ‘sink’ into the ‘suspension’ of the legs (the hamstring muscles) then this force and any additional incoming force is loaded down into the hydraulic piston (through the Adductor muscles). When the opponents arm is cleared out of the way with a Pak Sau, for example, then the whole-body acts like a compressed spring – releasing the energy up from the ground through the legs and body in the vertical pole and translating this into the horizontal centreline through the arms into the opponents core (Jic Seen). And, the greater the force that is exerted into the Wing Chun structure (although there is a breaking point) the faster the forwarding ‘spring’ is released providing more force into the opponent.
One useful way of thinking about the dynamics of Lut Sau Jic Chung is to think of someone bending back a plastic ruler, the more they bend it the more kinetic energy is loaded into it, and the harder it will spring back and slap themselves in the face if their hand slips. This is the same principle, and the same physics that are achieved in the correct, relaxed structural position of the Wing Chun Yee Chi Kim Yeung Ma stance.
Summary
In this second article we have seen that the path to relaxed structure means using the body in a whole new way. At the heart of this it means coming to understand the physiology of how your body works – and, how to maximise the efficient and effective use of this.
We have seen that this also involves understand some basic dynamics of force, and how to use the body to work with the laws of Physics and gravity to optimise your attack and minimise your opponents. This involves understanding how the skeleton is structured, the six major joints and beginning to understand the importance of moving away from external muscles, to internal core muscles. We have seen that finding the correct structure allows the external aspects to hang in a relaxed way with the feeling of weights attached to them – which allows the feeling of gravity. A feeling, when achieved, of putting on a very heavy chain-mail coat.
We have also seen that in order to find the ‘after’ position of relaxed structure, that the ‘before’ position must be internalised – you must take time to understand where you are starting from, and then break this down in order to refine this and then build this up again. We have seen that in order to build a stable tower this must be built from the ground up, once gravity has been allowed into the structure through the tipping of the pelvis. Here we have seen the importance of the position – where strength of shape is achieved through geometric structure (the triangular pyramid).
We have seen the importance of letting go of fighting with muscles, and especially in the arms. We have seen this involves allowing the structural position held by the correct muscles to become our new way of holding ourselves under the weight of gravity, of receiving incoming additional force from an opponent down into the ground, and in being able to deliver force from the ground into the opponent through the translation of the vertical and horizontal centrelines.
We have also seen that the different parts of the body must function together, uniting the upper and lower body into a whole-body unison that can then be used, through ‘sinking’ gravity to allow the relaxed structure to act as suspension and pistons to provide to provide the ‘forwarding’ and spring that allow lighting past, power attacks that are also able to deal with the incoming force of the opponent back into your ‘grounded’ structure.
Hopefully this article has filled a void for the developing student – inasmuch as it has at least given a conception of what the ‘after’ position looks like. Even if the path to it involves many complicated stepping stones that involves a journey which takes a long time to complete. If you are being asked to let go of one thing, then it is psychologically useful to feel that you have got something else to grab on to. This is where normally a developing student is required to have a huge amount of trust and faith in their Sifu, who must help them navigate through this void.
The next articles will take this starting position of ‘what’ the ‘after’ position looks like and will begin to explain how to make that journey through your training to one of achieving relaxed structure using gravity.
Copyright @ Craig Sands 2017

You must be logged in to post a comment.